


You work with a large amount of data which you want to evaluate in a PivotTable. In such case, Excel crashes often or gets very slow. Fortunately, Microsoft provides a solution. PowerPivot is an Excel add-in which can handle huge amounts of data. Unfortunately, only the newer versions of Excel in the ProPlus package got it included. For older version of Excel (2010 or before) you can still download it for free.
What does PowerPivot do?
Roughly speaking, PowerPivot offers a way to use a PivotTable on very large data sets. It jumps in when normal PivotTables would pass out already. Often, Microsoft Access would be the better choice to analyse such huge amounts of data. But many Excel users have never used Access before. In such case, PowerPivot provides a good opportunity to consolidate your data before further analyzing it with Excel.
How to install it?
As it has been pointed out in the comments section of this post, since Excel 2013 PowerPivot is only available for the ProPlus versions of Office. So, if you are running Excel 2010, please consider upgrading to 2013 or 2016 well.

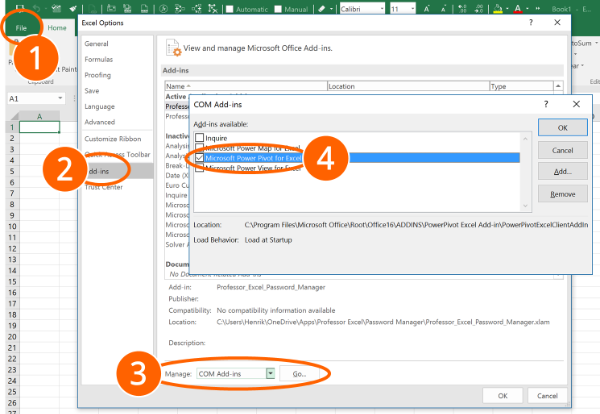
If you got Excel 2013 or 2016 ProPlus, PowerPivot is already built-in. If you can’t see the ribbon, please activate it within the Options. Therefore, follow these steps:
- Go to File and click on Options on the left side.
- Click on Add-ins.
- As PowerPivot is a COM add-in, select “COM add-ins” and click on “Go”.
- Set the tickmark “Microsoft Power Pivot for Excel”.
If you have Excel 2010 or older, you can download PowerPivot from the Microsoft Website for free. Go to this website, select your language and click Download. If you got the 64 bit version of Excel (here is how you can check which version you got) download the link having “64” written in it. If you got the 32 bit version you must choose the file haven x86 in it.
How to use PowerPivot?
Using PowerPivot is quite straight-forward. Just follow these quick steps (the numbers refer to the picture).

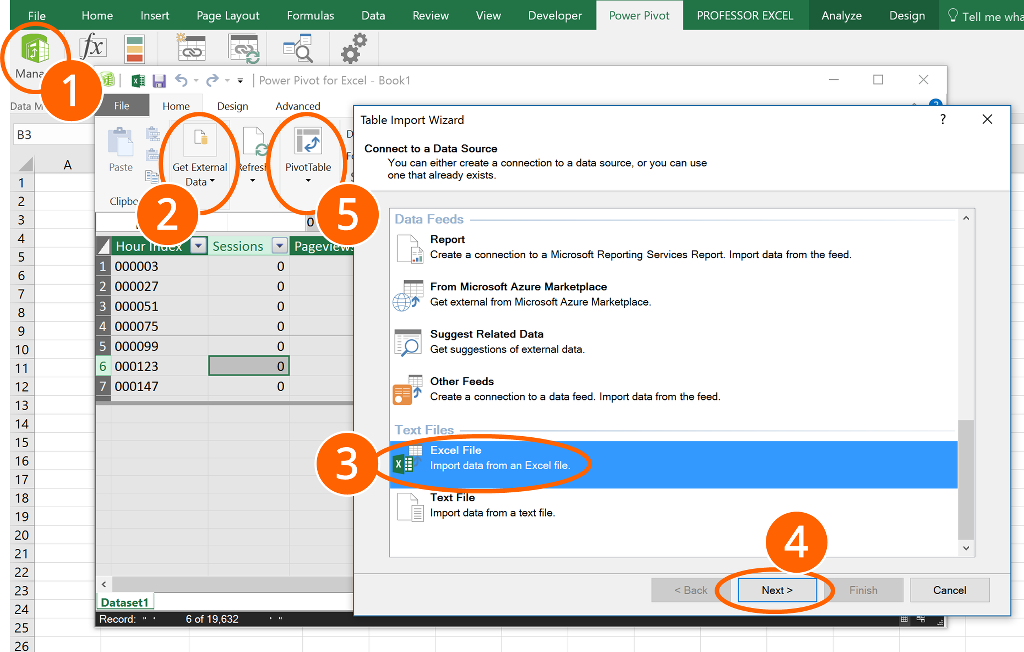
- Start by clicking “Manage” on the PowerPivot ribbon.
- Click on “Get External Data”.
- Besides database formats (also Microsoft Access, which can be useful), you can also import text files or other Excel files. In this case, you use another Excel file.
- Find the file on your drive and follow the steps on the screen for the import process. Please note: For a large amount of data the import takes some time. It might look as if Excel has crashed, but in most cases it didn’t. After some time it’ll show you how many rows have been imported.
- When the import is done, you can see the data in the main PowerPivot window. To create a Pivot Table from the data, click on “PivotTable”. Next, select the place for creating the Pivot Table.

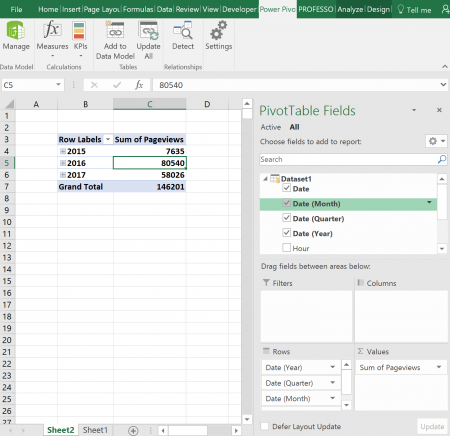
Now you can drag and drop the data as in normal Pivot Tables.
What data sources are possible to import into PowerPivot?
PowerPivot allows to import various types of data, including Excel tables itself. If you want to get data from another Excel file, click on Get External Data –> From Other Sources –> Scroll down –> Excel File.
Here is the list of all possible sources:
- From Databases
- SQL Server
- Access
- Analysis Service of PowerPivot
- From Data Services
- From Microsoft Azure Marketplace
- From OData Data Feed
- From Other Data Sources
- Microsoft SQL Server
- Microsoft SQL Azure
- Microsoft Analytics Platform System
- Microsoft Access
- Oracle
- Teradata
- Sybase
- Informix
- IBM DB2
- Others (OLEDB/ODBC)
- Microsoft Analysis Services
- Report
- From Microsoft Azure Marketplace
- Suggest Related Data
- Other Feeds
- Excel File
- Text File
- Existing Connections
Do you want to boost your productivity in Excel?
Get the Professor Excel ribbon!


Add more than 120 great features to Excel!
Tips and tricks
- Your Excel table is very large (e.g. >200,000 rows)? In such case, you could save your data as a separate worksheet and import it into PowerPivot. Next, you could consolidate it so that a normal Excel table can handle it.
- When normal Excel functions pass out (e.g. formulas, normal PivotTables), you could use PowerPivot. It is often a good strategy to divide your data and analysis in multiple file – one of which is a separate file only containing the data.
- Large amounts of data also need some time in PowerPivot. Even though it might look as if Excel has crashed, try to be patient. In most cases the import is still in progress and after some time it’ll also show the number of rows imported already.