


Admittedly – it can be a nightmare: Printing Excel sheets. You permanently feel like Excel hates you when you want to print an Excel sheet. That said, let’s take a look at the basics (like defining the print range) as well as advanced topics (like changing headers and footers on several sheets simultaneously).
How to start?

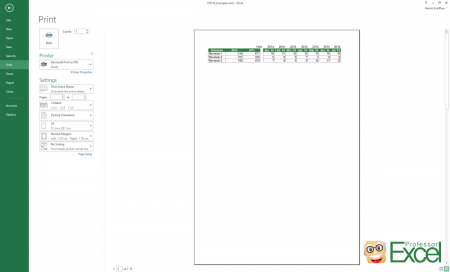
Starting is simple: Press Ctrl ![]()
![]()

But the actual work begins now: Defining the print range, page settings and all the other settings in detail. But maybe you got luck and somebody formatted the printout already…
Most settings can also be accessed via the Page Layout ribbon. The advantage to to it within the print screen (as shown in the image above) is that you can see changes right away.
How to squeeze everything on one page?
By default, Excel often wants to print your worksheet in a large size and spreads it over many pages. Fortunately there is a quick method of squeezing everything on one page:
- Open the print preview dialogue by pressing Ctrl


- On the left hand side click on “No Scaling”. Now you got the following options:
- “Fit Sheet on One Page”. That way everything will be squeezed on one printout page.
- “Fit All Columns on One Page”. Excel scales your page so that all columns are on one sheet. Rows might extend over several pages though.
- “Fit All Rows on One Page”. As it says, all rows will be fitted on one page. That means, the columns could spread over several pages.
How to set the printing range?

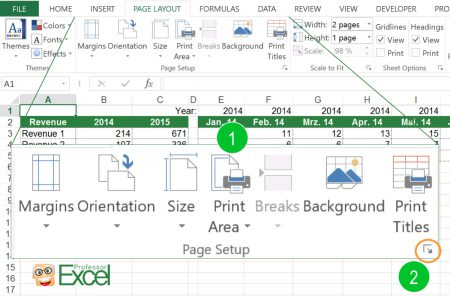
The fast way of setting the print range: Select the cell on the worksheet which you want to be printed.
Now click on “Print Area” on the “Page Layout” ribbon (number 1 on the picture on the right hand side). After that, click on “Set Print Area”.
One more advice: There is a tiny arrow in the right bottom corner which opens the window for all the printing preferences (number 2). With this button you can also set the rows and column to repeat. For more information on that topic please check the paragraphs below.
How to change and fine tune the printing range?

Especially when printing large worksheets on more than one page, you might want to fine tune the print range. For example, change the page break.
Therefore, switch to “Page Break Preview”: Click on “Page Break Preview” on the “View” ribbon. Excel then shows you the pages with blue and dotted blue lines. Not printed areas are greyed out. You can drag and drop these line to your desired format.
Please note that the mouse arrow often doesn’t work correctly: In many cases it doesn’t switch to the drag and drop mouse pointer. If that happens to you: just proceed. Usually the dragging and dropping still works well.
Do you want to boost your productivity in Excel?
Get the Professor Excel ribbon!


Add more than 120 great features to Excel!
How to repeat rows and columns?

If your worksheet spreads over more than one printed page, you can define rows and columns to repeat. That way, the header row or column will be printed on each page. Large tables are much easier to read.
You have to go through the “Page Layout” ribbon and set the print range there.
- Click on “Print Titles” within the “Page Setup” section on the “Page Layout” ribbon.
- Select the rows or column you want to be repeated.
- Confirm by clicking on “OK”.
Please note: You can’t change these settings if you go through the print preview window (see paragraph below).
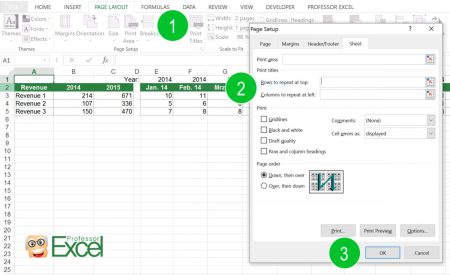
The fields for setting rows and columns to repeat are greyed out. What to do?

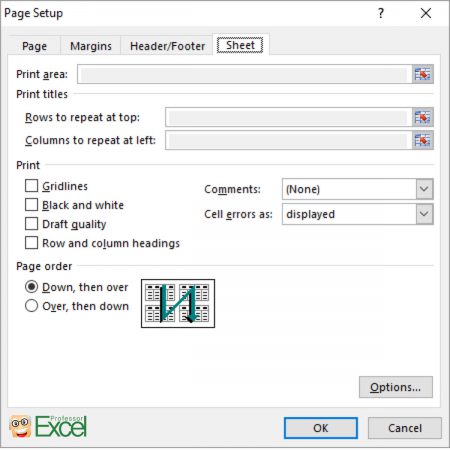
There is a strange bug in Excel – already for some years. After pressing Ctrl + p for opening the print window you can’t modify the rows and columns to repeat. The “Print area”, “Rows to repeat at top” and “Columns to repeat at left” are greyed out and can’t be changed as shown on the image.
Instead, you have to go through the “Page Layout” ribbon and set the print range there:
- Click on “Print Titles” within the “Page Setup” section on the “Page Layout” ribbon.
- Select the rows or column you’d like to repeat. Therefore click on the small button on the right hand side of each text field.
- Confirm by clicking on “OK”.
How to set headers and footers?

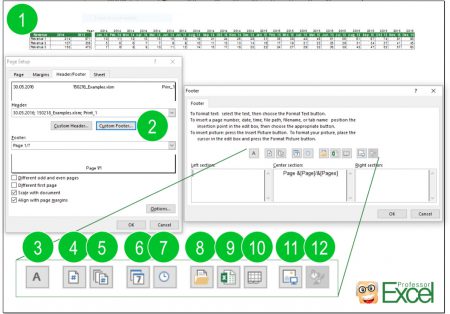
Very useful: Define headers and footers. The advantage is that you won’t mix up the printed pages. Follow these steps for inserting headers and footers (the numbers are corresponding to the image on the right hand side):
- Enter the print screen by pressing Ctrl
- Click on “Custom Header” or “Custom Footer”. Now you’ve got many options for defining headers and footers.
- Add a custom text by just typing into one of the text boxes. You can change the font style by clicking on the “A” button (number 3).
- Insert the number of the current page. This number will depend on the sheets you are printing. If you just print the second worksheet of your workbook, the numbering will still start at 1.
- Insert the total number of pages. Also this number depends on which sheets you are going to print.
- Insert the current date. This is the date at which you are printing the workbook – not the last save date.
- Insert the current time.
- Insert the file path of your workbook. By default, Excel adds the path and file name. If you only want to insert the path without the file name, type “&[Path]”.
- Besides the file path, you can also insert the file name.
- Often useful: Insert the sheet name.
- You can also insert a picture. Just click the button and select your picture.
- In most cases, you need at least to define the correct size of your picture. Once you’ve selected a picture with button “11” you can modify it by clicking on button number 12.
Example: You want to insert “Page 2 of 3”. Therefore enter “Page ” then click on button 4, type ” of ” and click on button 5.
These settings you can also add in different ways by typing the code. If you want to work with the codes, please refer to this table. For those of you who like to do some VBA programming we’ve also added the corresponding VBA code but we won’t go more into detail here:
| Header/Footer element | Code for inserting in Header/Footer window | VBA code |
| Insert Page Number | &[Page] | &P |
| Insert Number of Pages | &[Pages] | &N |
| Insert Date | &[Date] | &D |
| Insert Time | &[Time] | &T |
| Insert File Path | &[Path] | &Z |
| Insert File Name | &[File] | &F |
| Insert Sheet Name | &[Tab] | &A |
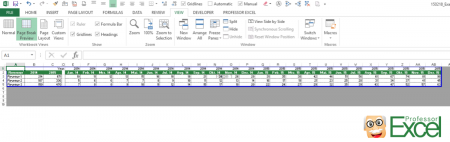
How to change print settings for several sheets at the same time?


Changing the print settings for several worksheets simultaneously is quite easy: Select all the sheets and press Ctrl ![]()
![]()
Attention: Even if you just want to change one setting (e.g. the headers and footers), everything will be resetted, for example also the print range or orientation. You could use this method as a starting point: Roughly define the print settings for all worksheets and afterwards fine tune each sheet separately.
Please refer to the next point if you want to change or update headers and footers for many sheets at the same time.
How to change headers and footers, when everything else is set already?

As described in our previous point, Excel destroys all existing print settings if you want to change the headers and footers of several sheets simultaneously. You basically have two options:
- Change the header and footer manually on each worksheet.
- Use an Excel add-in.
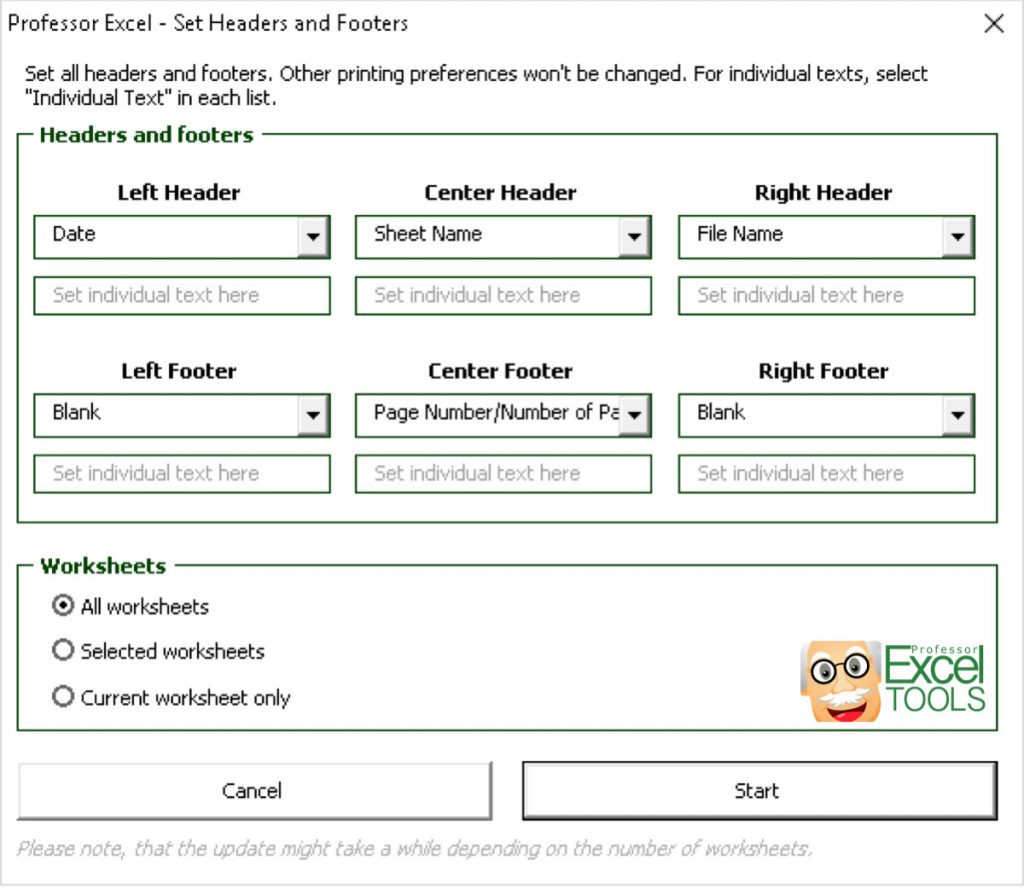
Our Excel add-in “Professor Excel Tools” provides a simple and comfortable tool for changing printing headers and footers without destroying existing print preferences like the orientation. Even better: It saves your previous print preferences.


This function is included in our Excel Add-In ‘Professor Excel Tools’
(No sign-up, download starts directly)
More than 35,000 users can’t be wrong.
How to center the printout range on the sheet?

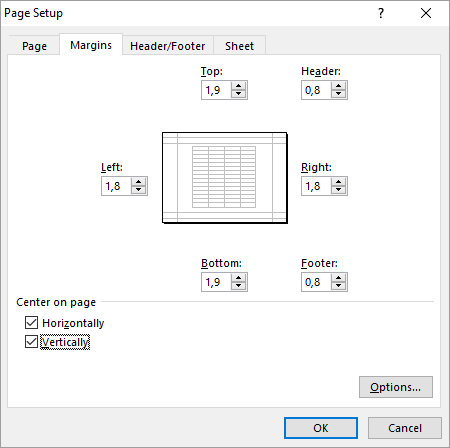
You want to center our table on the printout paper?
Again, open the print dialogue by pressing Ctrl ![]()
![]()
In the lower part of the window you can find the section “Center on page”. Set the tickmarks as desired for centering your table vertically or horizontally on the printout page.
How to change the orientation (portrait/horizontal)?

Like before, open the print preview. Either by clicking on “File” and then “Print” or by pressing Ctrl ![]()
![]()
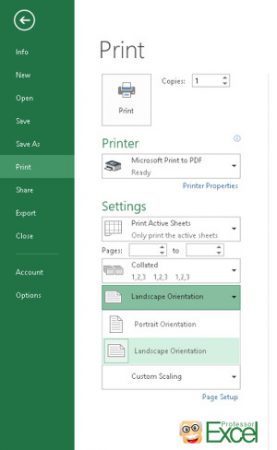
On the left hand side, select portrait or landscape. It’s that easy…
How to print odd or even pages only?

First question: Why do you want to print odd or even pages only? If the reason is that you want to print your Excel sheet on front and back side of the paper, please take a look at the print menu first. Most printers offer such option so that you don’t have to worry about odd and even pages.
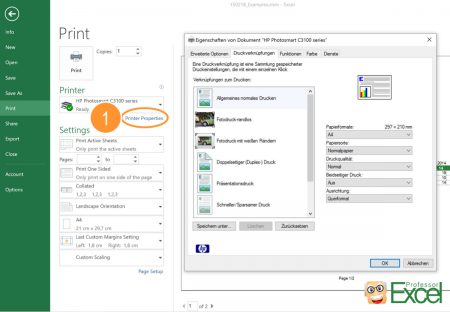
Therefore, press Ctrl + p on the keyboard. As usual, you will see the print preview. Then click on the “Printer Properties” button (number 1 on the image). Then the printer menu options – this windows looks different for each printer. You might have to search a little bit for that option.
You still want to print all odd or or even pages? The only option is a short VBA macro.
Open the VBA editor by clicking on “Visual Basic” on the left hand side of the “Developer” ribbon. Right click on and worksheet on the left hand side and click on “Insert” –> “Module”. Paste the following code and press start above:
Sub PrintOddOrEvenPages()
    Dim TotalNumberOfPages, StartPageNumber, CurrentPage As Double

    TotalNumberOfPages = Application.ExecuteExcel4Macro("GET.DOCUMENT(50)")
    StartPageNumber = InputBox("There are " & CStr(TotalNumberOfPages) _
    & " pages selected in total." & Chr(13) & Chr(13) _
    & "Which page do you want to start with?" & Chr(13) & Chr(13) _
    & "This number determines wether odd or even pages will be printed. " _
    & "Also make sure that the correct printer is selected as the printing will start right away.")

    If StartPageNumber > 0 And StartPageNumber <= TotalNumberOfPages Then
        For CurrentPage = StartPageNumber To TotalNumberOfPages Step 2
            ActiveSheet.PrintOut from:=CurrentPage, To:=CurrentPage, Copies:=1, Collate:=True
        Next
    End If
End Sub