


Did you know that Excel files are actually a zipped collection of XML files? You can easily explore and edit the complete structure of your Excel workbook. All you have to do: Rename and unzip the .xlsx file. Let’s take a look at it.
Some background information about the XML format
Before we jump in: Some background information. Excel files use the Open Office XML File Format. It’s an open standard so that also other software and developers can easily access your files. It’s documented well (the core document has more than 5,000 PDF pages). For your reference – here are the publicly available documents: https://ecma-international.org/publications-and-standards/standards/ecma-376/
Each Excel workbook contains of a bunch of folders and XML files. XML stand for Extented Markup Language. It works with opening and closing tags, e.g. <car name>BMW</car name> and looks similar to HTML. The good thing about this: You can (comparatively) easy read and understand the source code.
How to see the content of an Excel file, including the XML structure
It’s actually very simple to see all the content of your Excel file. Not the workbook itself in Excel, but rather its source code files. If you save your Excel workbook, it usually got the .xlsx ending. That means, your file is an Excel file which will open in Excel.
There is a trick:
- Save your workbook and close it.
- Rename it: Replace the .xlsx ending of the file name by .zip.
- Unzip it.
So you basically just replace the .xlsx by .zip. That way, your file will open in a new Windows Explorer and you can see all it’s content. When you enter or extract the contents it now you got a new folder with some subfolders. Each contains some XML files. You can open them with the text editor or – and that usually looks better – when a browser, e.g. Chrome.
Contents

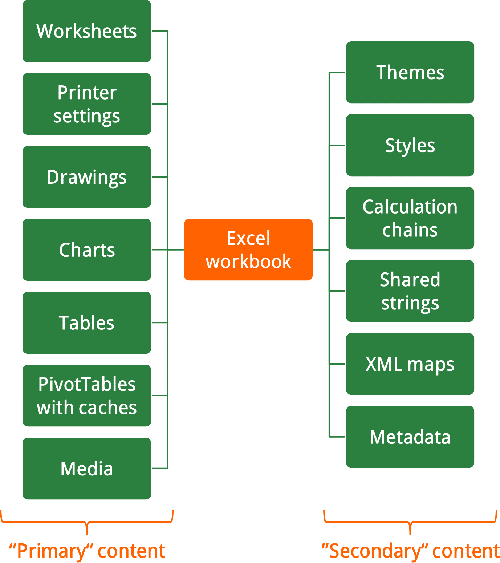
An Excel workbook can have various types of contents: The charts, tables, PivotTables, drawing, images and of course the actual worksheet or cell contents. This all must be saved somehow in the Excel file. But furthermore, there are many other information stored: Some meta data, calculation chains, themes and styles, named ranges and the relationship of all this data and files.
The image on the right side provides a rough overview of all the types of data saved in an Excel file. You can divide the content into the following two categories:
- “Primary” content: The actual content which you can see and access through Excel. For example, the cell contents, images, PivotTables, Tables and so on.
- “Secondary” content: Things you don’t exactly see, but still necessary for your Excel file to work.
Do you want to boost your productivity in Excel?
Get the Professor Excel ribbon!


Add more than 120 great features to Excel!
Basic XML contents

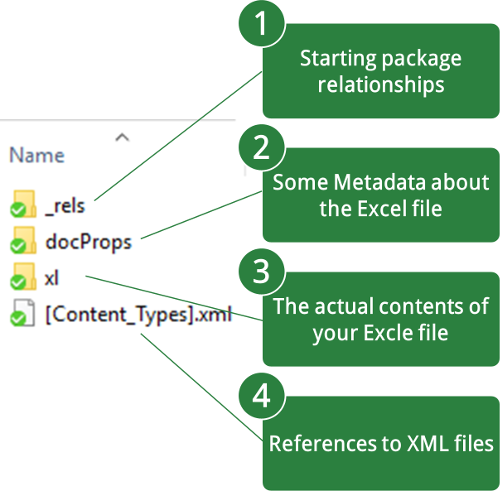
Each Excel workbook has some basic contents. A completely empty workbook already comes with these folders and files:
- _rels (Folder): “/_rels/.rels” is an XML file where the starting package-level relationships are stored.
- docProps (Folder): In most cases this folder has two files: app.xml and core.xml. Those files have some metadata. E.g. core.xml contains information about the auther, modified by, data created and date saved. app.xml on the other hand has some more information rather about the content of the file, e.g. if there are external links which need to be updated
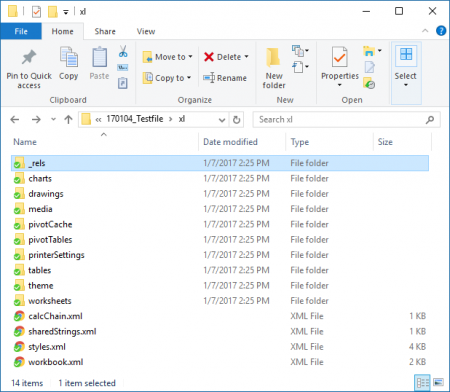
- xl (Folder): This folder has most of the information. By default it has 3 subfolder: “_rels”, “theme” and “worksheets” as well as two more XML files styles.xml and workbook.xml.
- [Content_Types].xml: The XML file [Content_Types] is the only file on this level. It has references to the XML files within the folders above.
How a worksheet is saved

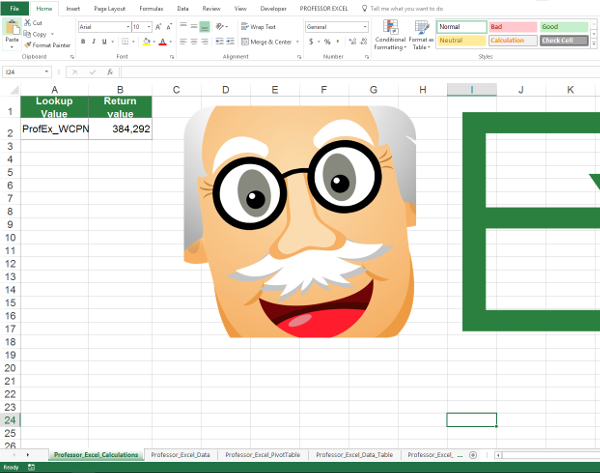
There is one XML file for each Excel worksheet. So, these worksheet XML files are saved within the folder “xl/worksheets”. So, let’s take a look at an example worksheet (see the screenshot on the right side).
This worksheet has some content in the cells A1, B1, A2 and B2. The cells A1, B1 and A2 only have text whereas the cell B2 has a formula (a VLOOKUP). There is also an image, the cell I24 is selected. So how does the underlying source code look like?

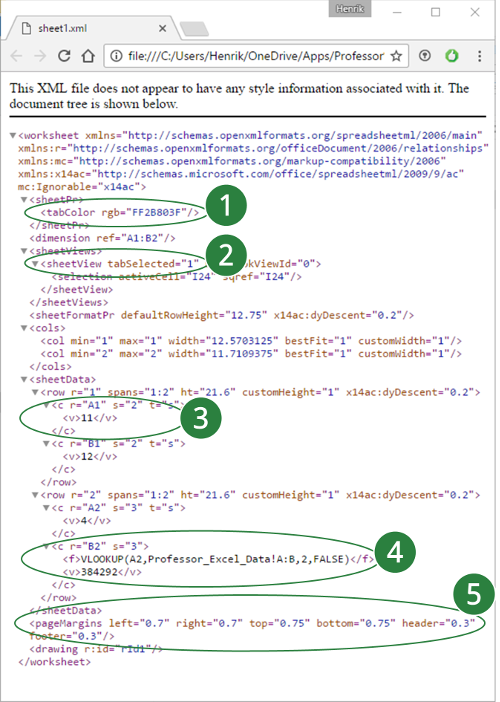
Actually, the XML file doesn’t look to complicated. Let’s take a look at some selected lines of code:
- The tab has a dark green color. It’s formatted with the tag “<tabColor”, followed by the RGB value.
- This sheet is selected. So it got the tag “<sheetView tabSelected” set to 1.
- Number 3 is quite interesting: It has the content of cell A1. As you can see in the screenshot above, the text in cell A1 says “Lookup Value”. But instead of this text, the XML code just says “11”. This number 11 refers to the 11th entry on the XML sheet “sharedStrings”. That way Excel makes sure that each text is only saved once in order to save space.
- The cell B2 has a VLOOKUP formula. That means, the complete formula is saved with the tag “<f>” and the calculated value – which you will see immediately when opening the workbook – is also stored under the tag “<v>”.
- The page margins are also saved.
The image is just inserted with the reference “<drawing r:id=”rId1″/>”.
Advanced contents

Besides the basic worksheets, Excel files can have much more content. So, this content could be
- PivotTables with their cache. The actual source for the PivotTable doesn’t have to be included in the workbook file.
- Named ranges: The named in the workbook.xml file in the xl folder.
- Drawing: Images and charts count as drawings. The image itself will be stored in the folder xl/media the charts in xl/charts.
- Tables: Data tables are saved with their headlines and range under xl/tables. The values are saved separately though. They are still in the corresponding worksheet XML file.
More information
You want to know more? There are some interesting websites available:
- Overview of the Open XML SDK: https://msdn.microsoft.com/en-us/library/office/gg278316.aspx
- Information about the Open Packaging Conventions: https://en.wikipedia.org/wiki/Open_Packaging_Conventions
- A good summary of the XML and Excel file structure: http://www.jkp-ads.com/Articles/XMLAndExcel00.asp
- Archive of the underlying Office Open XML File Formats: http://www.ecma-international.org/publications/standards/Ecma-376.htm
- Check out our big guide about the Excel file types.