


You probably don’t need this every day: But once a file you might want to have a list of all files within a folder or directory in Excel. The good thing: There are many methods available. If you Google it, you will find a lot of different methods to create a file list in Excel. But unfortunately, all of them have advantages and disadvantages – which you usually only find out after trying them. That’s the reason for this article: You won’t only learn each method step by step: You will rather find an overview comparing all the advantages and disadvantages of each method. After seeing this, you don’t need to start extensive trials and errors. Much better: You can easily select the method that works best for you!
Summary
| Method 1: Copy & Paste on Mac | Method 2: Named function | Method 3: Internet browser | Method 4: PowerQuery | Method 5: Excel-Add-In | Method 6: Windows PowerShell | Method 7: VBA Macro | |
|---|---|---|---|---|---|---|---|
| Short description | Copy and paste from the Mac Finder. | Use a function in a named range to insert a file list. | Open folder with a web browser and copy the file list. | Use PowerQuery to insert a directory. | Let an Excel add-in do the work for you. | Use the Windows built-in PowerShell feature. | Use a VBA Macro to insert a file list. |
| Ease of use | |||||||
| Operating system | Mac | Windows | Windows / Mac | Windows / Mac | Windows | Windows | Windows |
| Include subfolders and files | No | No | No | Yes | Yes | Yes | (Yes) (depends on the VBA macro) |
| File information available | File names | File names | File names, file links (not working properly), file size, date modified | Folder path, name extension, date accessed, date modified, date created Content type, kind, size, ReadOnly, hidden, S system, directory, archive, device, normal, temporary, SparseFile, ReparsePoint, compressed, offline, NotContentIndexed, encrypted, ChangeTime, SymbolicLink, MountPoint | Links to files on the drive, file path, date and time last saved, date and time created, file size, file type | File name, file path, date and time last saved, file size | Depends on the VBA macro |
| Technology | Mac Finder | Named function in Excel | Internet browser | PowerQuery | Excel Add-In | PowerShell, Text Import Wizard | VBA |
| Comment | Fast but with limited options. | Only shows files, no folders. | File links not working in our test; not working with all internet browsers (tested with Google Chrome and working). | Elegant and uses built-in functions. | Convenient, fast and many options. | Results not good, difficult process; performs well on large file structures, though. | Modifying the macro rather for advanced users. |
| Link | Click here | Click here | Click here | Click here | Click here | Click here | Click here |


Method 1: Simply copy and paste from Mac Finder to Excel

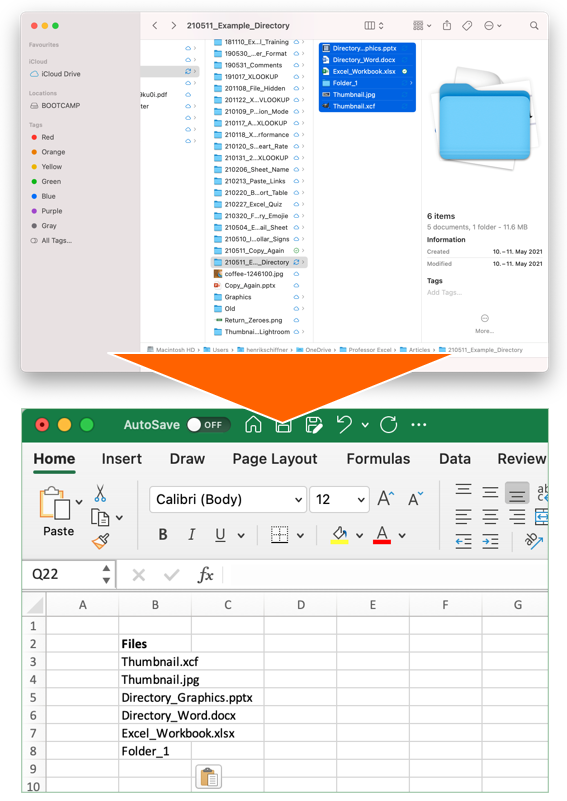
This first method works on a Mac only: Just select all files in a Finder window and press copy (Command + C on the keyboard). Next, switch to Excel and paste the list: Press Command + V on the keyboard.
The advantage of this method is that it’s very easy and fast. Unfortunately, you don’t have any further options than just pasting the file names. That means you can’t insert data of subfolders or file properties.
Recommendation: Use this if you need a quick file list on the Mac – without any further information.
Method 2: Insert a file list with built-in Excel functions using “Named Ranges”
The second method is actually quite elegant: Use built-in Excel functions to insert a file list in Excel. It is built on advanced functions, such as an Excel function within a named range. But following these steps should be quite straight-forward.
Set up the named range

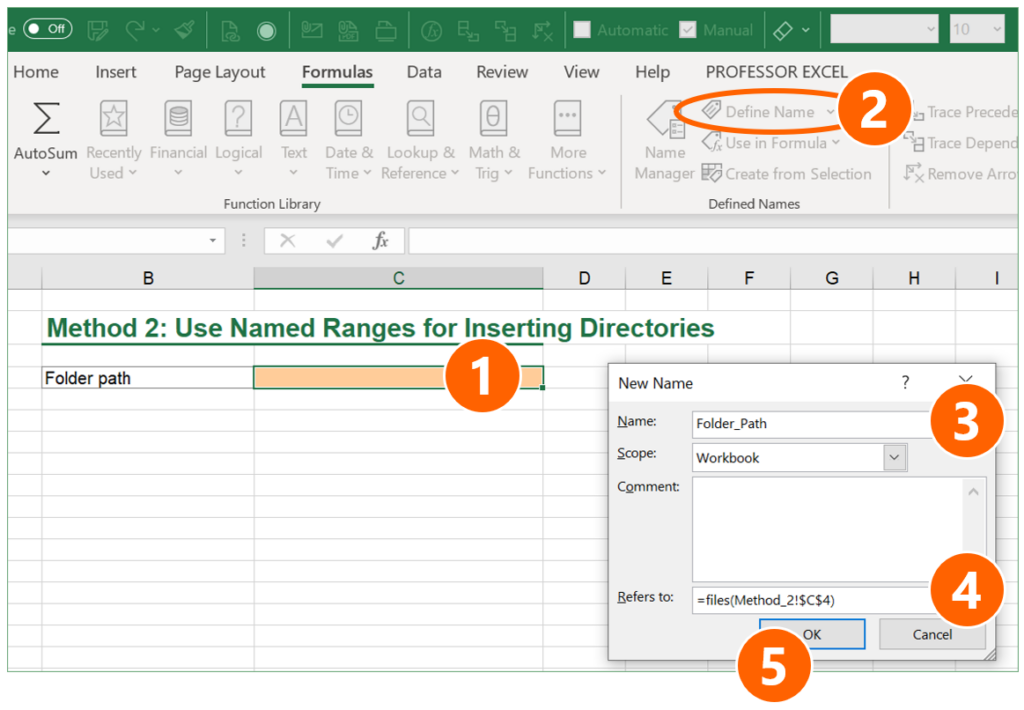
- Choose a cell in which you later write the folder path. In this case, it’s cell C4.
- Click on “Defined Name” on the Formulas ribbon.
- Give a name for the cell containing the folder path (here: “Folder_Path”)
- In the “Refers to” field, type: =files(linktopathcell) (replace “linktopathcell” with your cell reference – in this case “Method_2!$C$4”).
- Confirm with OK.
Use the named range in Excel functions

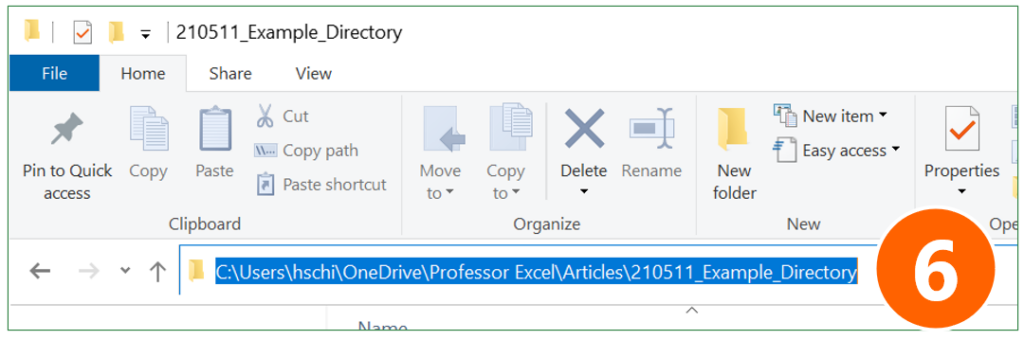
- Go to the Windows Explorer and copy the folder path.

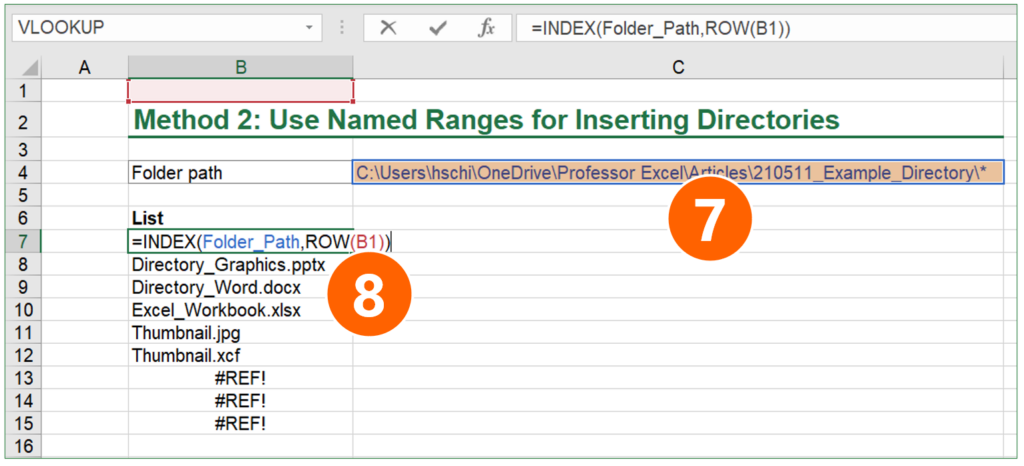
- Paste the folder link into the folder path cell (the cell you have set as the named range in step 1 above). Add one of the following endings:
- If you want to include all files – no matter which file type – in your list, add \*
- For listing only Excel files, add \*.xls*
- If you want to see all files ending on “.xlsx”, add \*.xlsx
- As the last step, enter an INDEX function for compiling the list (here in cell B7):
=INDEX(Folder_Path,ROW(B1))
Folder_Path should be the same name that you have given in step 3 above. The ROW function should refer to any cell in the first row (for example to B1). That means, this argument could also be A1, C1, etc.
As the last step: Copy the INDEX function down until you see the first #REF error. #REF means in this case that there are no more files in your folder. If you like, you could wrap the IFERROR function around in order to mitigate the error.
Recommendation: Use this if you only need a list of files (no subfolders) that dynamically updates itself.
Method 3: Use an internet browser to quickly copy and paste a file list to Excel
I must say, I like this idea because it’s almost as fast as our method number 1 above: Open a folder in a webbrowser and then copy & paste the list to Excel.

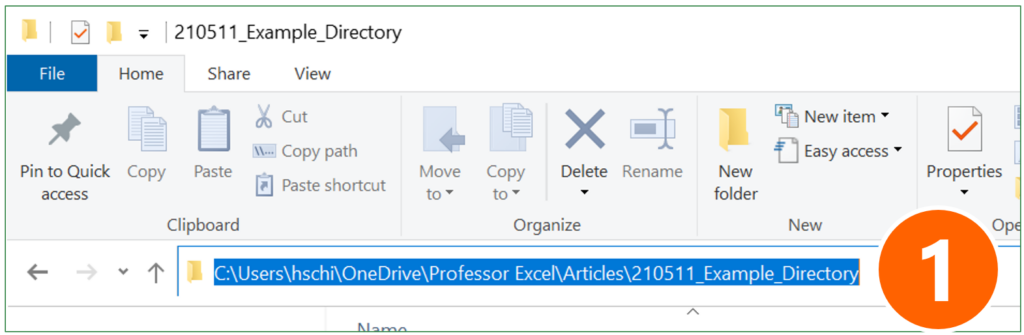
- Copy the folder path from the Windows Explorer like on the screenshot or Mac Finder (for Mac: open file Info (right-click on folder and then on “Get Info”. Select and copy link from “Where” section).

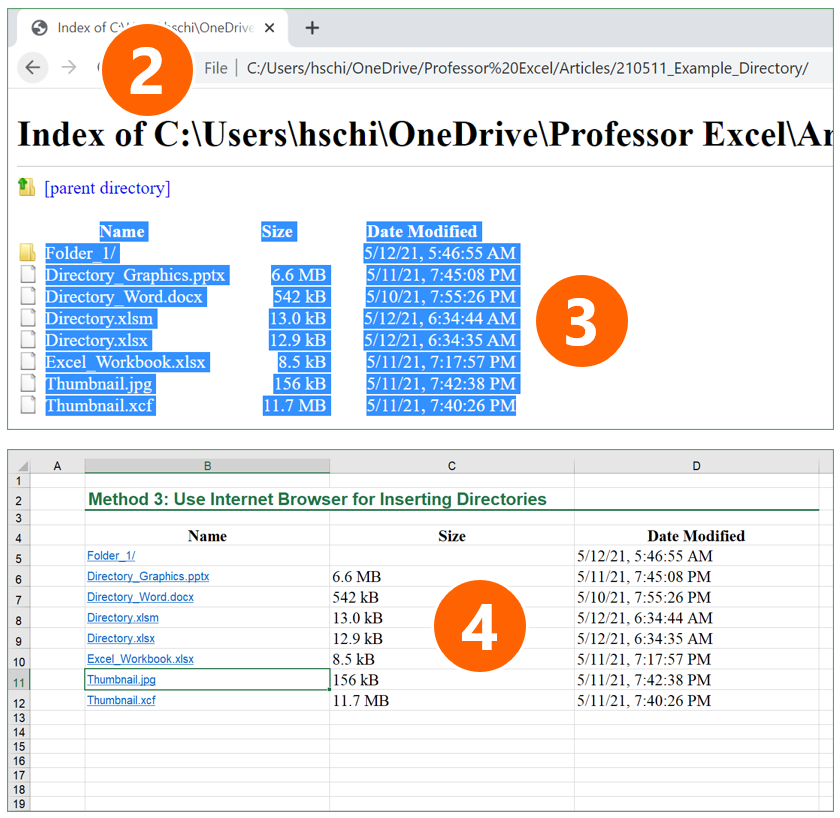
- Open a browser, for example Google Chrome (should be working with most other browsers as well). Paste the previously copied link into the address field.
- Copy the table of files.
- Open Excel and paste the file list.
One comment to this methods: The links (which are also created) usually won’t work in Excel.
Recommendation: Use this if you quickly need a file list (without subfolders), including some file properties such as file size and date last saved.
Method 4: Create a file list with PowerQuery

The next method is also among my favorites: It uses PowerQuery and comes with the advantages that it doesn’t require any complex programming or third-party technologies. Also, it can be refreshed easily later on.
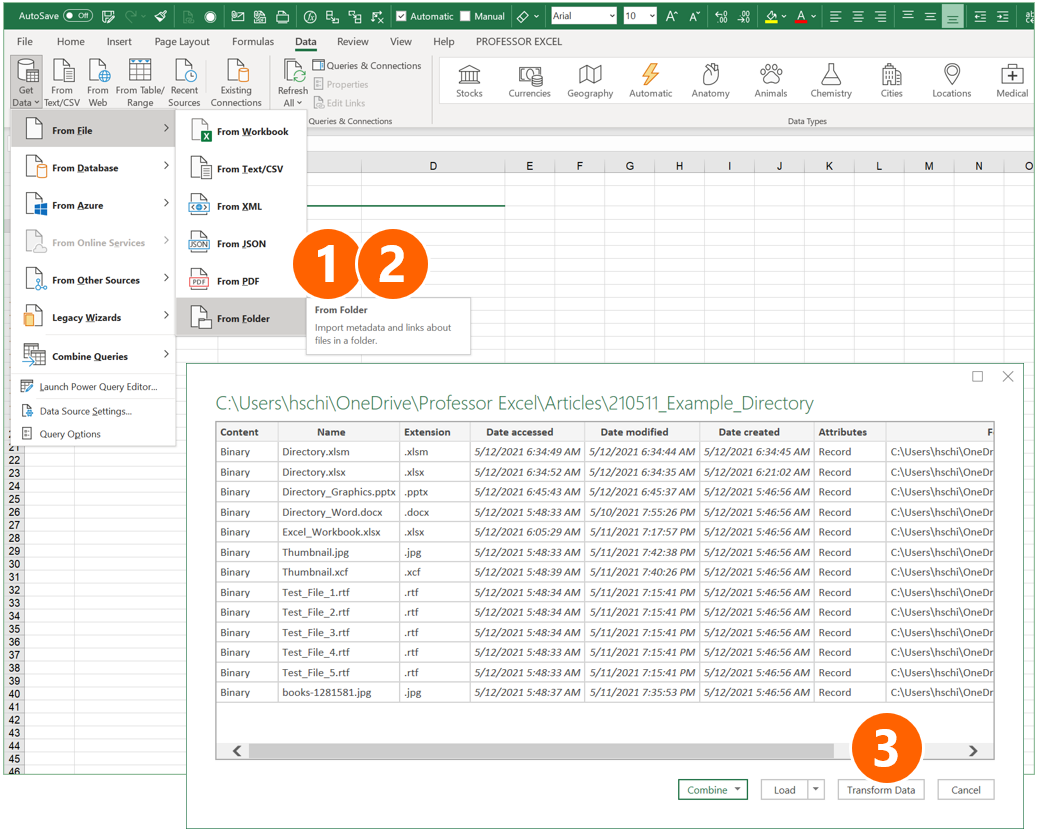
- Go to the Data ribbon, click on “Get Data” on the left, and select “From Folder” in the “From File” sub-menu.
- Select the Folder and click on “Open” (not in the screenshot on the right).
- You can now see a preview. Click on “Transform Data”.

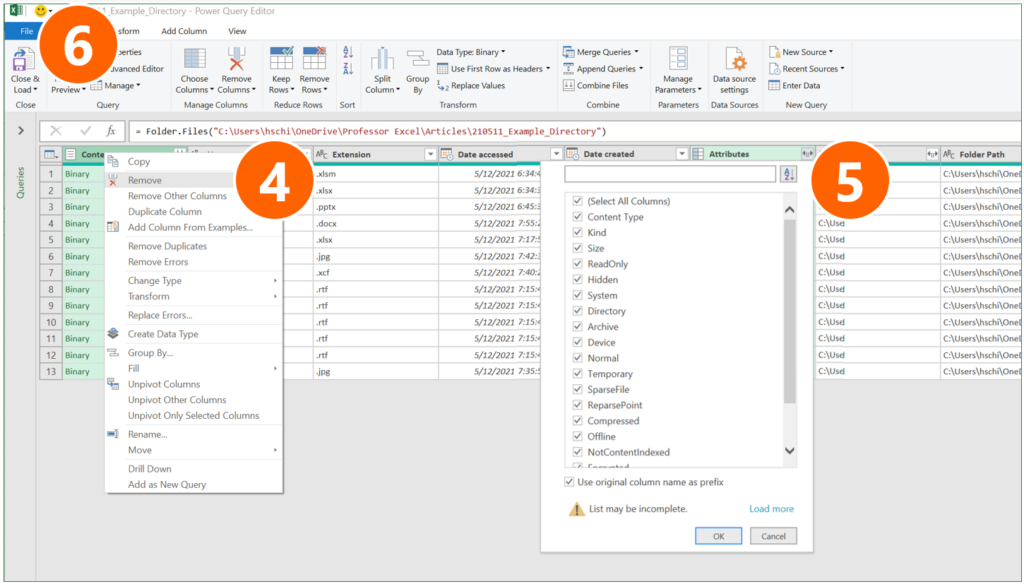
- Remove the first column “Content” (right-click on the heading and click on “Remove”).
- If you want to see more file attributes than shown already in the preview, click on the small arrows of the “Attributes” column and select the attributes.
- Click on Close & Load.
Recommendation: Use this method if you to have lots of file properties. It can later on easily be refreshed.
Method 5: Excel Add-in Professor Excel Tools
The Excel add-in Professor Excel Tools offers a function to easily insert directories. It regards subfolders and can insert various file properties:
- Links to files on the drive
- File path
- Date and time last saved
- Date and time created
- File size
- File type

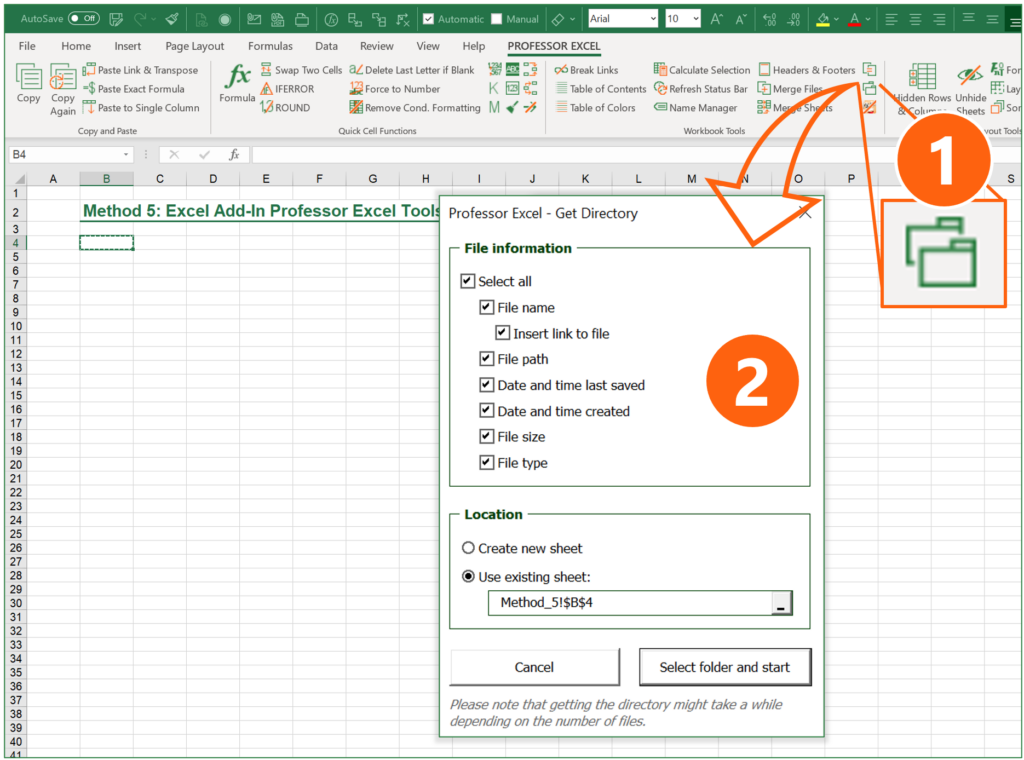
You can further specify, where the directory should be created.
Using the “Get Directory” function is very simple:
- Click on the Directory button on the Professor Excel ribbon.
- Select all the file properties you’d like to show and the location, where the directory table should be placed in your Excel file.
- Click on “Select folder and start”. Then, choose the folder and proceed with ok.
That’s it. Please feel free to download Professor Excel Tools here.

Recommendation: Use this method if you accept third-party add-ins within Excel. If you do, it’s quite convenient and fast.


This function is included in our Excel Add-In ‘Professor Excel Tools’
(No sign-up, download starts directly)
More than 35,000 users can’t be wrong.
Method 6: Use PowerShell to extract a file list
As you can see in the following description, using PowerShell takes quite a lot of steps. It might be useful, though, if you have very large folder structures. Otherwise, try to use a different method.
Open PowerShell and write the directory into a text file


- Navigate to the folder which you want to have the file list from. Hold down the Shift key on the keyboard and right-click on it (if you don’t hold down the Shift key, the option of “Open PowerShell window here” is not available).
- Click on “Open PowerShell window here”.
- Copy and paste the following code and press enter afterwards:
Get-ChildItem -Path $MyInvocation.MyCommand.Path -force -recurse > filelist.txtImport text file into Excel
Open Microsoft Excel.

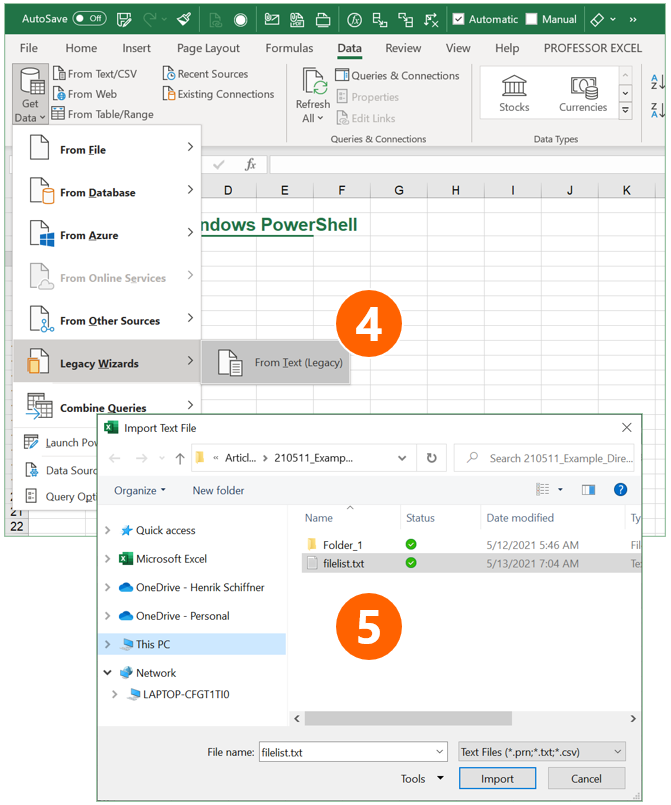
- Open the Text Import Wizard: Go to the Data ribbon, click on “Get Data” on the left, then on “Legacy Wizards” and then on “From Text (Legacy)”. If this option is not available, you can activate it within the Excel settings (check this article for more information).
- Select the file filelist.txt from your folder. In step 3 above it was created within your target folder.


Follow the import steps of the Text Import Wizard on the screen:
- In the first step of three, make sure that “Fixed width” is selected. Click on Next.
- In the lower part of the window, Excel shows a preview of your import. Check here, if the column separators are set correctly: You can move the vertical lines if necessary or add more by clicking on the respective number in the heading of the preview. Then click on Next and in the third step Next again. After that finish the Text Import Wizard by selecting the location where the file list should be placed.
- As you can see in number 8, the file list is inserted, but has some disadvantages: Directory paths are cut, each subfolder has its own block, and so on.
In a nutshell: This method of creating file lists within Microsoft Excel via PowerShell is complex and the results aren’t as good as in the other methods.
Recommendation: Try to avoid this method.
Do you want to boost your productivity in Excel?
Get the Professor Excel ribbon!


Add more than 120 great features to Excel!
Method 7: Let a VBA Macro loop through the files
The following VBA code creates a list of all files in a folder. The list will be placed on the currently active worksheet, starting from cell A1. Please make sure that you don’t override anything here.
Sub InsertFileList()

Dim objFileSystemObject As Object, objFolder As Object, objFile As Object, i As Integer

Set objFileSystemObject = CreateObject("Scripting.FileSystemObject")
Set objFolder = objFileSystemObject.GetFolder("Your folder path")

For Each objFile In objFolder.Files
    i = i + 1
    ActiveSheet.Cells(i, 1) = objFile.Name
Next

End Sub
Here is how to use the VBA-Code. If you need more help of how to use VBA macros, please refer to this article.
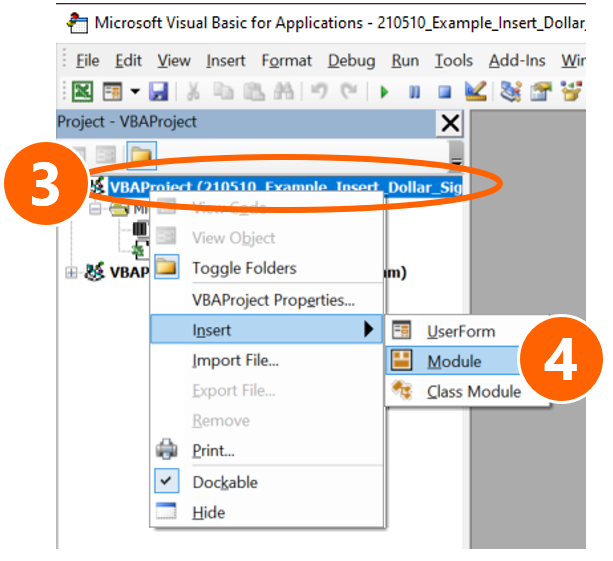
- Copy the VBA code from above.
- Open the VBA editor by pressing Alt + F11 on the keyboard.
- Insert a new module: Right-click on the active workbook name on the left.
- Go to “Insert” and click on “Module”.

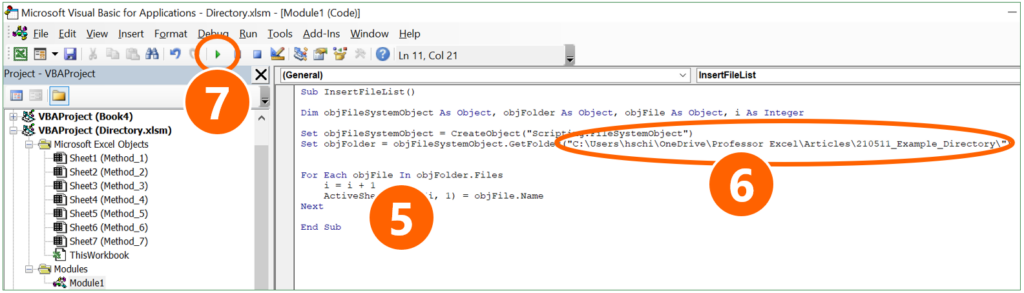
- Paste the code by pressing Ctrl + V on the keyboard.
- Replace Your folder path with the path from your own folder.
- Click on start in the VBA editor.
Download


Please feel free to download all examples from above in this comprehensive Excel workbook. Each method is located on a different worksheet. Just click here and the download starts.