No matter if you use Microsoft Word, PowerPoint, Outlook or OneNote: You can easily insert bullet points and create bullet point lists. In Excel you can’t. But there are some simple workarounds. In this article, you learn 6 methods for inserting bullet points in Excel.
Introduction
Like said in the introduction, there is no very smooth way to create bullet point lists in Excel. Either the methods require several steps or the result just doesn’t look very nice. In this article, you learn 6 methods of inserting bullets in Excel – either directly into the Excel cell or to a text box. In the summary section of this article, you can download all 6 methods in a comprehensive Excel workbook.
Method 1: Alt + 7, Alt + 9 or Alt + 0149
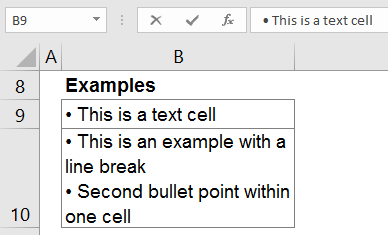
The first method is usually also the fastest: Insert the bullet symbol with a keyboard shortcut. In order to achieve this, enter a cell (for example by pressing F2 on the keyboard) and press Alt + 7 on the number pad.
- Use Alt + 7 for the “normal” bullets •.
- Press Alt + 9 for empty bullets ○.
- Use Alt + 0149 for “normal” bullets •.
Please note:
- The keyboard shortcut only works with the number pad. Not with the number keys above the normal letter keys.
- Press and hold the Alt key while pressing the number keys consecutively.
- Text cells with line breaks don’t look very nice because the second line doesn’t have the same indentation as the first line.
- As you can see on the screenshot above, you can also have several bullets within one cell. Add line breaks by pressing Alt + Enter on the keyboard.
Method 2: Insert the bullet symbol from “Symbols”
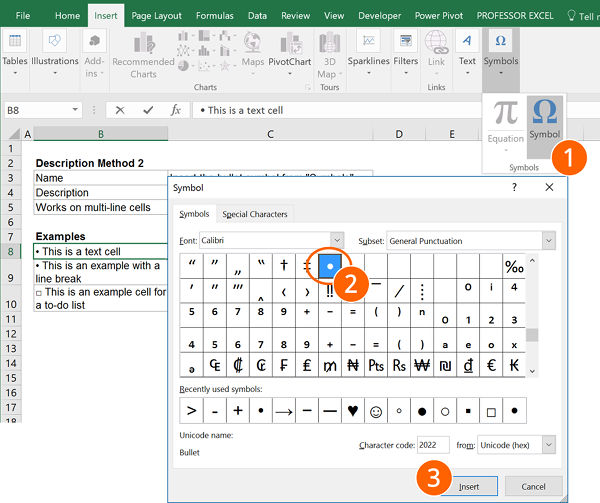
The second method is quite similar to our first method above. But instead of using a keyboard shortcut, you manually insert the bullet character.
- Click on “Symbol” on the right-hand side of the “Insert” ribbon.
- Select the character you’d like to use as the bullet symbol.
- Press Insert.
Please note:
- Instead of the conventional bullets, you could also insert any other type, for example empty bullets, square bullets or empty square bullets for to-do lists.
- Like with method 1 above, multi-line texts don’t look very well because the text has no indentation.
Do you want to boost your productivity in Excel?
Get the Professor Excel ribbon!

Add more than 120 great features to Excel!
Method 3: Copy and paste the bullet point character (from here)
This method is again very similar to methods 1 and 2 above. Instead of inserting the character with a keyboard shortcut or from the “Symbol” menu, you could just copy and paste it from there. Please feel free to copy any of the characters below.
• ● ◦ ▪ □ ♥ ─ − → ►
Method 4: Use a custom number format
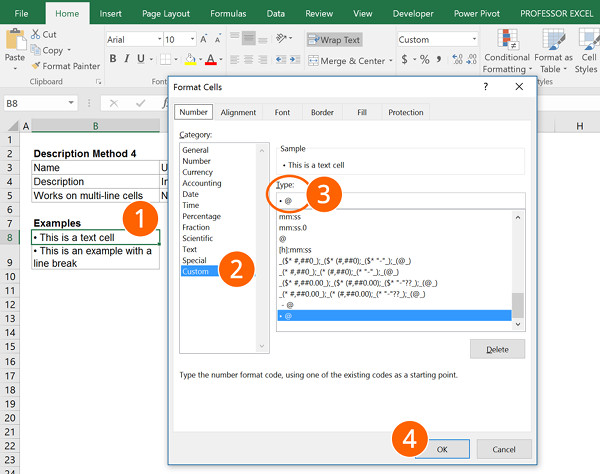
If you don’t want to insert the bullet character for every cell again you could just define a custom number format which adds the bullet character automatically.
- In order to achieve this, select a cell or a cell range and press Ctrl + 1 on the keyboard.
- Go to the “Number” tab and select “Custom” on the left-hand side.
- Write • @ into the field for “Type”.
- Confirm with “OK”.
Please note:
- You can copy and paste this format using the “Format Painter”.
- If you want to know more about custom number format, please refer to our comprehensive guide.
Method 5: Add an additional column
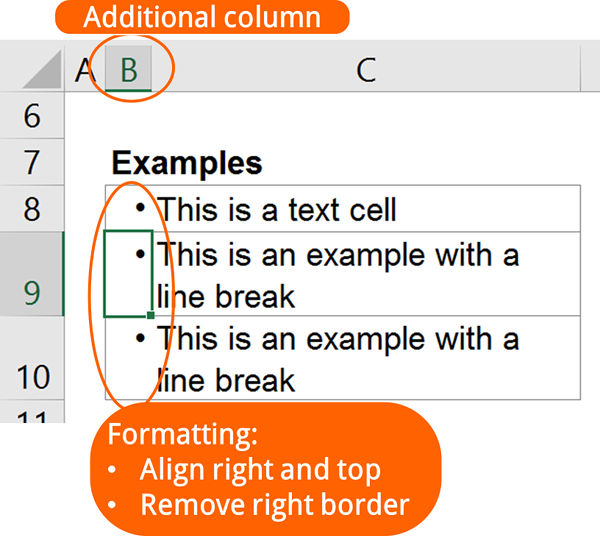
The fifth method for inserting bullet points usually looks most tidy. The idea is to insert an additional column containing the bullets. Please take a look at the example on the right-hand side.
- Column B contains the bullet points whereas column C contains the text cells without any bullet symbols. Please refer to the methods 1 to 3 in order to insert a bullet symbol.
- The formatting of column B is
- Align top.
- Align right.
- Remove the border between columns B and C.
Please note:
- This method is especially nice if your text cells have line breaks.
- Setting up an additional column usually takes a little more work than the other methods mentioned above.
Method 6: Bullets in text boxes and charts
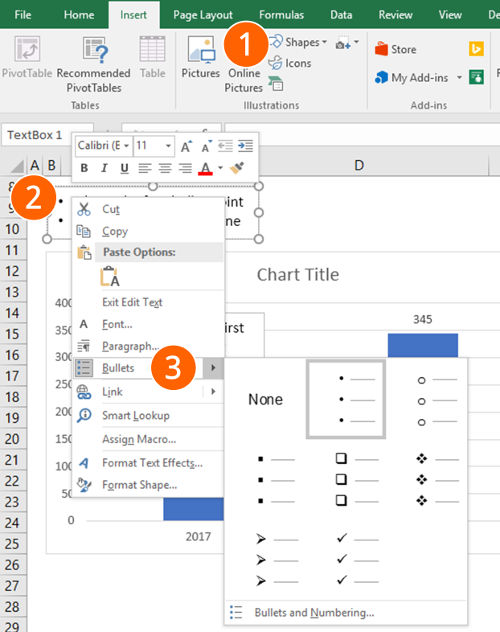
If you don’t want to add bullet points inside an Excel cell but to a text box in Excel instead, you can use the built-in function.
- Insert a text box either into your chart or the worksheet itself. In order to achieve this, click on “Insert” and then “Shapes”. Select the text box and draw it onto the screen.
- Right click into the new text box.
- Click on “Bullets”. If you want to change the type of bullets, click on the small right arrow.
That’s it. Now you can start typing your text.
Summary of bullet points in Excel
In this article, you learn how to insert bullets to text cells and text boxes in Excel. The first 4 methods introduced above insert the bullet symbol into your Excel cell. Method 5 uses an additional column which has the advantage, the multi-line cells have a nice line break. The sixth method deals with bullets in text boxes.
| Method 1 | Method 2 | Method 3 | Method 4 | Method 5 | Method 6 | |
| Name | Alt + 7, Alt + 9 or Alt + 0149 | Insert the bullet symbol from “Symbols” | Copy and paste the bullet character (from here) | Use a custom number format | Add an additional column | Bullet points in text boxes and charts |
| Description | Insert the bullet symbol | Insert the bullet symbol | Insert the bullet symbol | Insert the bullet symbol | Use a helper column for the bullet symbol | Insert a text box and right click into it. Then click on “Bullets” |
| Works on multi-line cells | No | No | No | No | Yes | Yes |
Please feel free to download the example workbook here. It contains 6 detail worksheets (for each method one worksheet) plus the summary table.
Was this page useful for you?
- If not: Please let us know how we could improve it for you.
- If yes: Why don’t you sign up for our free, monthly newsletter?

