
Excel workbooks usually have an acceptable file size. But sometimes, they are unreasonably large. There are several reasons for a big file size coming with different way of how to reduce it. Depending on the content of your Excel workbook some methods will work better than others. So, let’s try them one by one.
Preparations: Check which worksheet causes the large file size
The important question: What part of your Excel workbook causes the large file size. Basically, there are several options:
- Large data, usually worksheets with more than 100,000 rows and/or many columns.
- Pictures: Do you have any images in your file?
- Pivot Tables: Pivot Tables store the underlying data so (depending on the number of Pivot Tables) in worst case, each Pivot Table contains the data set.
- Formatting: If sheets are formatted although cell ranges aren’t used, the file size might increase.
- Others: Meta-data, other invisible contents.
For each of these types, the approach of reducing the file size is different. So how do you find out, which type(s) might be the case for you?
Either, you just go ahead and try the following methods. Or – and that’s the recommended way – you do it more systematically. We recommend you to check the file size of each worksheet. Then you just start with the largest worksheet and depending on the type, you just do the specific methods.
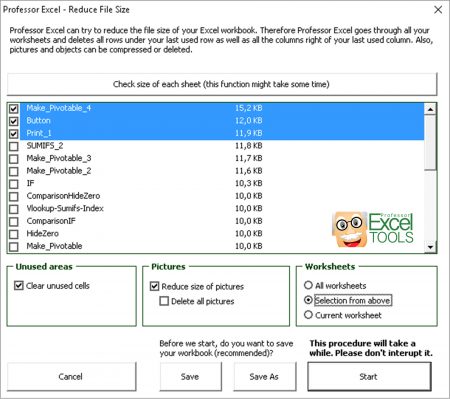
How do you get to know the file size of each worksheet? There is no simple built-in way in Excel. But our Excel add-in helps (7-day free trial without sign-up): Just press the “Reduce File Size” button and then click on “Check size of each worksheet”.

This function is included in our Excel Add-In ‘Professor Excel Tools’
(No sign-up, download starts directly)
More than 35,000 users can’t be wrong.
Method 1: Reduce the size of pictures

One common reason for large Excel files are pictures within the workbook. Fortunately Excel offers a function for compressing images: The resolution will be decreased and the invisible areas can be removed. Just follow these steps (the numbers are corresponding to the picture on the right hand side):
- Select one image in your workbook.
- Activate the Format ribbon which is now available (Mac: ‘Picture Format’).
- Click on ‘Compress Pictures’ so that a new window opens for defining the compression settings.
- If you want to compress all pictures in your current workbook remove the first tick. Excel can also delete the cropped areas of pictures if you’ve used the cropping tool.
- Select the resolution. Maybe you try the highest resolution first and go down step by step. Monitor the impact on the file size by saving the workbook after each compression.
- Click OK to confirm.
Method 2: Remove the formatting from unused cell ranges
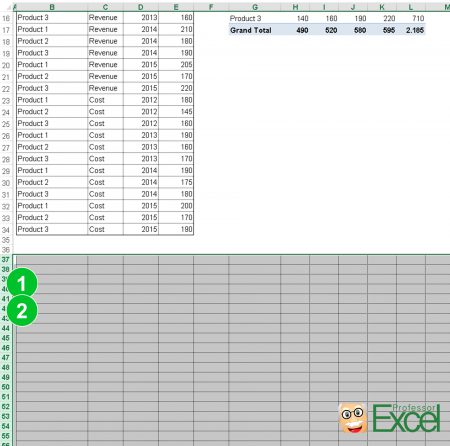
When you apply a cell format to whole rows or columns, Excel often needs a lot of disk space. You can try to delete all the unused areas below and on the right hand side of your data:
- For rows: Select all rows below your last row with content.
- Press Ctrl + ‘–’ on the keyboard for deleting the rows. Sometimes, this doesn’t remove the formatting. For making sure that the formatting is really deleted continue with step 3 and 4.
- Click on the rubber button on the right hand side of the Home ribbon.
- Click on ‘Clear All’.
Repeat these steps on every worksheet, also for the columns. Save the workbook afterwards for checking, if the file size is reduced.
This method could reduce the file size – depending on your formatting and style – by max. 94%.
Method 3: Zip or split the workbook
3a) Zip your workbook
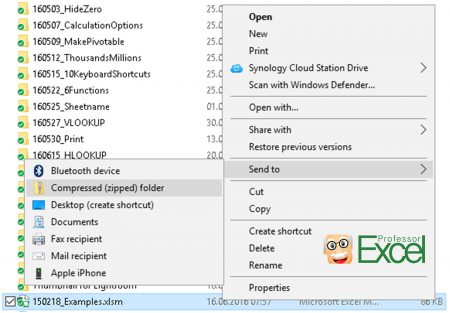
If your Excel workbook contains large amounts of data, zipping the whole file after you are done editing often helps a lot. Basically, Excel files are zip files already (you can try it by just replacing .xlsx by .zip), but surprisingly, zipping the files again helps.
- On a Windows computer: Right click on the file in the Windows Explorer. Click on ‘Send to’ and then on ‘Compressed (zipped) folder’.
- On a Mac: Search for the file in the finder, right click on it and click on ‘Compress [filename]’.
This method could reduce the file size – again depending on your file – by app. 15%.
3b) Split the workbook
Depending on how urgent you need to reduce the file size of your workbook you might consider splitting the file: Divide the workbook into two or more files, for example the first workbook for all the inputs and one sheet for consolidating the inputs. The second workbook has the actual calculations based on just the consolidation sheet from workbook 1.
Do you want to boost your productivity in Excel?
Get the Professor Excel ribbon!

Add more than 120 great features to Excel!
Method 4: Reduce the size of Pivot Tables
Pivot Tables sometimes consume a lot of space: They use a cache in which the data is stored. There are basically three options to reduce the size of Pivot Tables:
- In many cases, Pivot Tables are created for quickly checking data or gaining an overview. Do you still need all the Pivot Tables in your workbook? If no, remove some and check the impact on the file size.
- When creating several Pivot Tables with exactly the same source data, don’t create them from the scratch but rather copy them. That way you can make sure that the data cache is shared.
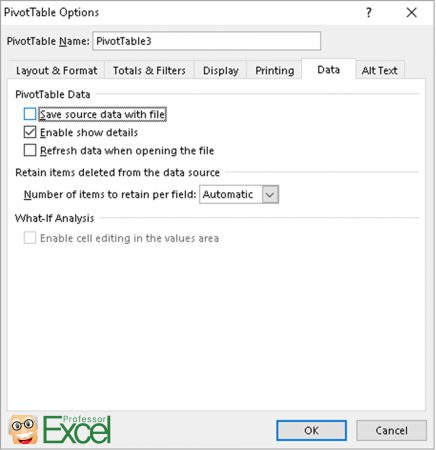
- Try this option: Don’t save the source data with the file. Right click on the Pivot Table and then click on Pivot Table Options. On the data tab remove the tick from ‘Save source data with file’.
Method 5: Remove unused content
This is the most obvious step so you’ve probably considered it already: Do you have any unused contents which you can delete? Are there hidden sheets which are not needed any more? If there is anything you don’t need any longer (if you are not sure, save a backup copy of the file), please go forward and remove the sheets or cell ranges.
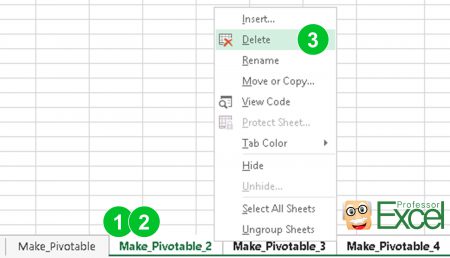
In case of worksheets, follow these steps:
- Select the worksheets you don’t necessarily need any longer by holding the Ctrl key
 and clicking on each sheet.
 - Right click on any of them.
- Click on Delete.
Method 6: Reduce the file size with Professor Excel Tools
Probably the most comfortable way of reducing the file size of your Excel workbook is with the Excel add-in ‘Professor Excel Tools‘. It provides the following functionalities:
- Create a list of all worksheets and their size.
- Delete all the unused areas.
- Compress or remove the pictures from the workbook.
Please use the free trial version for checking if it works for you (download button below).
This function is included in our Excel Add-In ‘Professor Excel Tools’
(No sign-up, download starts directly)
More than 35,000 users can’t be wrong.
Method 7: Use the XLSB file format
This is one of the easiest methods of reducing the file size and at the same time the opening time of Excel workbooks: Save your Excel file in the XLSB file format. Besides these two obvious advantages, the XLSB format has some (usually minor) disadvantages though: The main disadvantage of XLSB files is that they can contain VBA macros (for more information please refer to this article: XLSX, XLSM or XLSB: Which File Type Is the Best for You?)
Changing the file format of your Excel file is very simple:
- Click on “File” next to the “Home” ribbon.
- Click on “Save As” on the left side.
- On the bottom of the “Save As” window change the drop-down field “Save as type” from XLSX to XSLB.
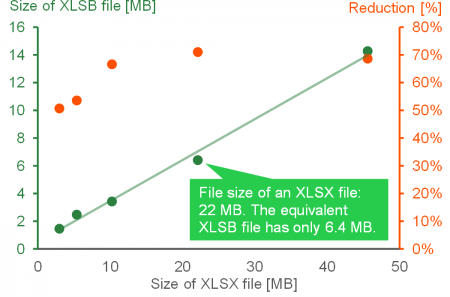
The effect: You can easily reduce the file size by 70%. A quick test with a file containing mostly formulas and hard values showed a reduction of the file size between 60% and 70%. As you can see in the figure on the right side, it’s especially worth changing the file format for XLSX files larger than 10 MB. On the horizontal x-axis, you have the file size of a XLSX file. If you change the file format to XLSB, the file size reduces significantly, shown on the vertical y-axis.
Hi Henrik,
My excel has table in 2013 format saved in .xlsb format. Files has nearly 24 sheets. Of which 12 sheets have 1 Pivot table each and others are paste of pivot table values. Since we need to refer pivot table data in other tables/sheets.
Now after applying all the suggested methods. My file size is still 7MB+ and I want to get it reduced below 5MB.
Users are facing excel crash issues due to this.
Could you please suggest any other alternative methods.
Vielen Dank,
Swapna