
In this article we take a look at how to remove formulas from cells and replace them by their calculated values. But even more: We explore, how to deal with filtered lists or if you only want to convert some selected Excel cells to values. Let’s get started!
Goal of this article
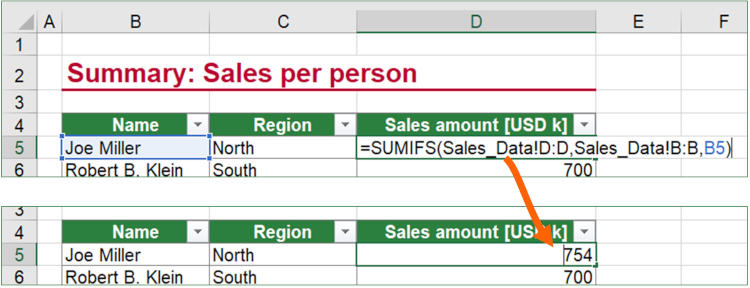
The goal is to remove the formulas and functions from Excel cells and instead only have their calculated values:
Furthermore you learn how to do this with non-adjacent cells.
Convert adjacent formula cells to values
Let’s start with the simple scenario: You want to convert an entire list of adjacent cells to values. That means, formulas and functions will be removed and instead, the cells only contain their calculated values.
One word of caution, before we start: Your Excel file might lose its functionality because you remove formulas!

- Select all cells you want to convert.
- Copy them, either by clicking on the Copy button on the Home ribbon or pressing Ctrl + C on the keyboard.
- Paste them using “Paste Special”. Instead of pressing Ctrl + V, press Ctrl + Alt + V on the keyboard.
- Select “Values”.
- Click on OK.
Convert selected, non-adjacent cells only
The problem with our method above is that if you copy a range of non-adjacent cells and paste them, Excel pastes them next to each other. That means, the method above doesn’t work.
In this case, we have three options:
- Insert a (short) VBA macro.
- More comfortable is to use an Excel add-in, such as Professor Excel Tools (click here to scroll down to the section).
- The third approach highly depends on your file. One option could be to make the cells adjacent. In case of a filtered list, for example, you could sort the list and then use the copy and paste method as described above. Because this approach is very individual, we won’t go further into detail here but rather concentrate on the other two methods.
Excursus: How to insert VBA macros
Before we start, just a little recap of how to insert VBA macros.
- Open the VBA editor. The fastest way to do this would be to press Alt + F11 on the keyboard.
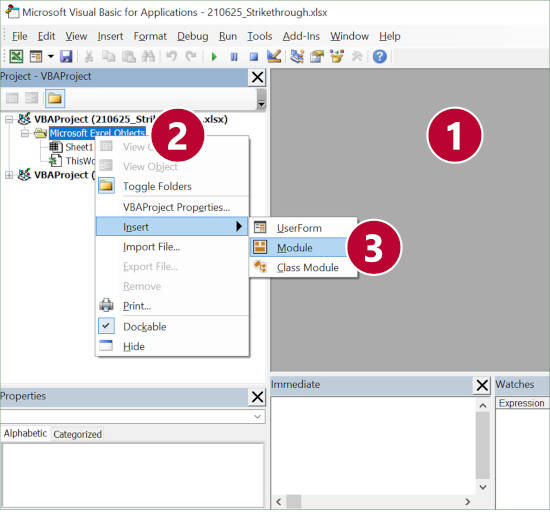
Alternatively, go to the Developer ribbon (if you don’t see the developer ribbon, you must activate it first) and click on Editor. - Right-click on the Excel file VBA name (or any other item below, for example the “Microsoft Excel Objects” folder icon as in the screenshot).
- Go to Insert and click on “Module”.
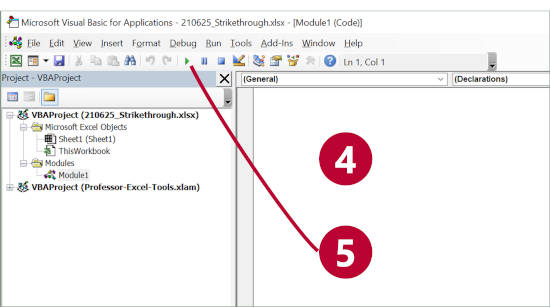
- Now it should look similar to number 4 and you see the white code area in which you can paste the VBA source codes from below.
- Press Start to run the macro.
(For more help with VBA macros please refer to this article).
VBA macro to convert all selected cells to values
Use the following code and steps; if you need assistance with inserting a new module (as in step one below), please scroll up.
- Open the VBA editor (press Alt + F11 on the keyboard) and copy and paste the following VBA code into a new module as described above.
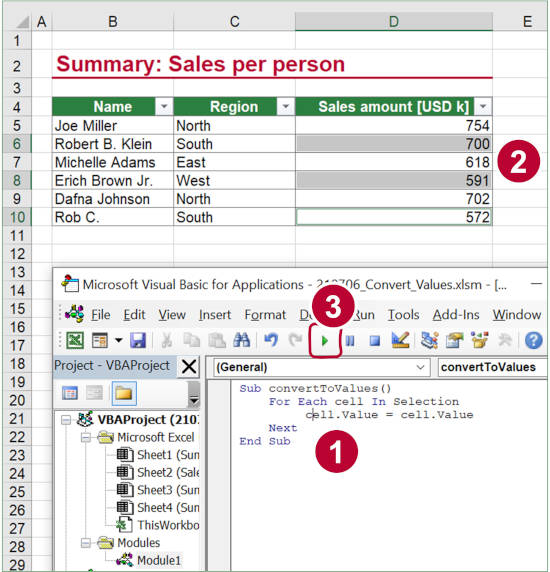
- Jump back to your Excel file: Select all cells you want to convert to values in your Excel sheet.
- Go once again back to VBA (make sure the mouse cursor is somewhere placed inside the code) and click on Start.
And here is the code for you to copy and paste it:
Sub convertToValues()
    For Each cell In Selection
         cell.Value = cell.Value
    Next
End Sub
Convert all visible cells in a filtered list to values
Let’s take it to the next level: Instead of manually selected cells, we now work with a list that is filtered. The following steps guide you to select all visible cells (that means, the cells you have not filtered out).

- Filter your list as desired. As usual, if the row numbers on the left of your Excel sheet are blue it means that you have applied filters.
- Select the whole range (including the hidden, filtered-out cells).
- Open the Go To Special window by clicking on “Find & Select” (located on the right side of the Home ribbon) and then on “Go To Special”.
- Check “Visible cells only”.
- Confirm with OK.
- As you can see, all hidden or filtered-out cells are not selected any longer.
- Now you can continue with the same VBA macro as in the section before (click here to scroll there).
Use Professor Excel Tools to do all this with just two clicks
Our Excel add-in Professor Excel Tools offers a function to convert all selected cells with just one click to values.
After installing Professor Excel Tools, click on “Change Reference” and then on “Values”. Now, all formulas convert to hard values. If desired, use the built-in “Selection Tools” to select all visible cells (instead of the more complicated Go To Special function of Excel).
See yourself, how easy it is:
You can try Professor Excel Tools for free. Click here and the download starts right-away.

This function is included in our Excel Add-In ‘Professor Excel Tools’
(No sign-up, download starts directly)
More than 35,000 users can’t be wrong.
Image by Richard Woeber from Pixabay
does it work in office 2021? If not, Whats your suggestion?