
Excel is one of the most popular applications in the business life. No wonder, that there is lots of sensitive data saved in Excel workbooks and sheets. Excel provides methods to secure this data: By protecting them with passwords. But Excel also offers much more than just using passwords on complete workbooks: You can also protect contents on single sheets, areas on worksheets and single cells. In this article, you’ll learn all this: From protecting entire workbooks to single cells. Even better: You’ll learn how to unprotect them as far as possible.
Introduction

Before we jump right in, let’s take a look at the different levels of protection in Excel first.
There are three levels:
- File level: The whole file is locked. There are different variations here, but the most important one is the encryption of the file. This protection is comparatively strong (it of course also depends on your password).
- Workbook level: Protection on workbook level let’s you open the workbook. But you can’t change the structure.
- Worksheet level: You can protect single worksheets in Excel or just some ranges.
Please note, that number two and three (workbook- and worksheet level) are rather weak and can often be bypassed.
How to set passwords for complete Excel workbooks
Excel offers to use password protection on your entire workbook. But we have to differentiate: Do you want to stop people to open the workbook or only to modify it (e.g. open as “Read-only”). Excel offers both options.
Passwords to open Excel workbooks (=file level)
The fastest way to set passwords to the entire workbooks so that people can’t open the files without them.
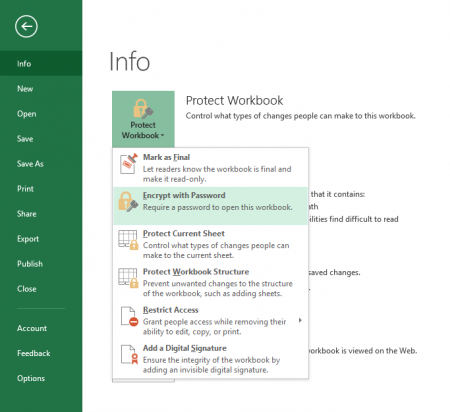
- For the first way just click on File and navigate to “Info” on the left side.
- The first button says “Protect Workbook”. Click on it and then on “Encrypt with Passwords”.
- Next enter your password.
Thats’ it.
Passwords to modify Excel workbooks (e.g. open read-only is allowed)
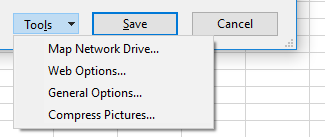
You also got the option to let people open your workbook but don’t modify the contents. You can do this via the “Save As” dialogue box. Therefore, press F12 on the keyboard.
On the bottom of the “Save As” window, you got the “Save” button. On the left side of it is a button “Tools”. When you click on it, you will see 4 options, one of them is “General Options”. Click on it.
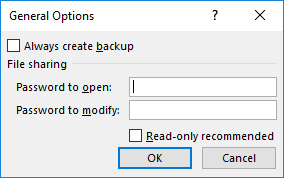
Now you will see a small new window like the screenshot on the left side. You can either set up a password to open the workbook or to modify it (or both, of course). Once you click enter, you have to enter the passwords again in order to confirm them.
How to protect the workbook structure (=workbook level)
If you don’t want other users to mess with your workbook structure, you can also protect it. That way, your co-workers or clients can’t
- view hidden worksheets,
- add worksheets,
- move worksheets,
- delete sheets,
- hide worksheets,
- rename worksheets.
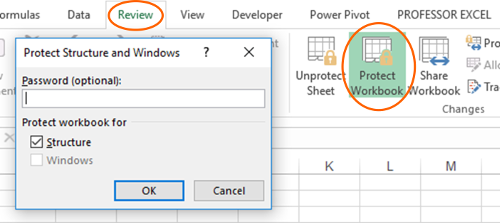
For protecting the worksheet structure, go to Review and click on “Protect Workbook”. Choose a password or leave the password field blank. If you don’t enter a password, the workbook is still protected, but it can be removed easily by just clicking the “Protect Workbook” button again.
Do you want to boost your productivity in Excel?
Get the Professor Excel ribbon!

Add more than 120 great features to Excel!
How to protect worksheets (=worksheet level)
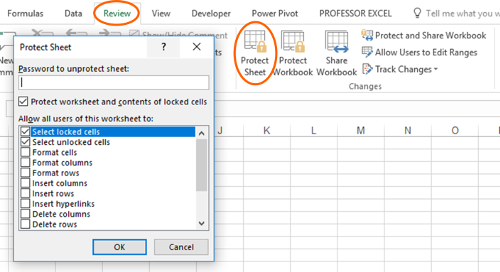
Protecting single worksheets is quite simple. Go to the sheet you want to protect. On the “Review” ribbon, click on “Protect Sheet”.
Now you can select the detailed rights of users. E.g. should the user be allowed to select cell, to format cell, insert cells and so on.
Confirm by clicking OK. The button “Protect Sheet” on the “Review” ribbon should now be called “Unprotect Sheet”.
Please note:
- If you’ve before defined ranges on the worksheet you users are allowed to modify, users will still be able to edit those cells.
- You don’t have to require a password. You can use this function also without a password. But please keep in mind, that users can easily unprotect the sheet by clicking on the “Unprotect Sheet” button.
How to protect areas on worksheets (=worksheet level)
Let’s say, you’ve created a beautiful form. Now other people (co-workers, clients) have to fill it out. But you want to prevent, that these people change anything else than the dedicated fields.
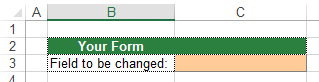
As an example, you got a simple form and users are only allowed to change cell C3. This example is shown in the picture on the left side.
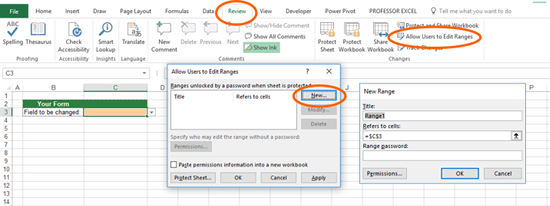
There are two steps:
- Define the areas which should be protected. Therefore, click on “Allow Users to Edit Ranges” on the Review ribbon. Next click on new. Now you can define which ranges the user is allowed to edit. The rest of the worksheet will be protected.After selecting the cell or cell range, you can also choose a range password. This password can be different than the general worksheet password. If the user enters this password, he can edit the cell.
- Protect the sheet. Either on the same window (left bottom corner) or click on “Protect Sheet” on the Review ribbon. Only after activating the sheet protection,
Strategies to remove password protection
Password protection for entire workbooks
Please note: We don’t actively maintain Password Manager any longer. If you are still interested in it, please contact us.
Unfortunately (or luckily, depends on your situation) the encryption of whole files in Office is very strong. Therefore, there are no tools available for hacking an encrypted workbook. But there are some advice on how to open a password protected workbook:
- Trial and error: Try your recent passwords. Maybe you got a hit.
- Passwords are case-sensitive. That means, small and capital letters matter. So maybe you’ve switched on caps lock?
- Especially for multilingual users: Is it possible, that your keyboard input language has (automatically) changed? Next to the clock in the right bottom corner of your screen, what keyboard language does it show?
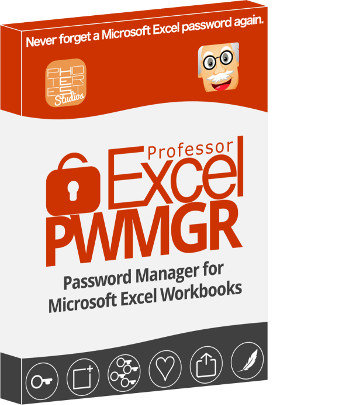
- Use a password manager. We offer a password manager, called Professor Excel Password Manager. It saves your password when you open the workbook for the first time. You can also look up passwords or export them. It saves your passwords locally (with a light encryption) and won’t be transferred over the internet. Please be aware, that anyone with access to your computer could look up your passwords.
Password protection for ranges or worksheets
There is a VBA macro for unprotecting Excel worksheets available on the internet. It’s quite short but unfortunately seems only to work until Excel 2010.
Sub PasswordBreaker()
    'Breaks worksheet password protection.
    Dim i, j, k, l, m, n, i1, i2, i3, i4, i5, i6 As Integer
    Dim currentPassword As String
    On Error Resume Next
    For i = 65 To 66
        For j = 65 To 66
            For k = 65 To 66
                For l = 65 To 66
                    For m = 65 To 66
                        For i1 = 65 To 66
                            For i2 = 65 To 66
                                For i3 = 65 To 66
                                    For i4 = 65 To 66
                                        For i5 = 65 To 66
                                            For i6 = 65 To 66
                                                For n = 32 To 126
                                                    currentPassword = Chr(i) & Chr(j) & Chr(k) & Chr(l) & Chr(m) & Chr(i1) & Chr(i2) & Chr(i3) & Chr(i4) & Chr(i5) & Chr(i6) & Chr(n)
                                                    ActiveSheet.Unprotect currentPassword
                                                    Application.StatusBar = "Current password: " & currentPassword
                                                    If ActiveSheet.ProtectContents = False Then
                                                        MsgBox "One usable password is " & Chr(i) & Chr(j) & Chr(k) & Chr(l) & Chr(m) & Chr(i1) & Chr(i2) & Chr(i3) & Chr(i4) & Chr(i5) & Chr(i6) & Chr(n)
                                                        Exit Sub
                                                    End If
                                                Next
                                            Next
                                        Next
                                    Next
                                Next
                            Next
                        Next
                    Next
                Next
            Next
        Next
    Next
End Sub
Credit (with some minor changes) and for more information, please refer to this website.
To enable cells to be edited while leaving o 00004000 nly some cells locked, you can unlock all the cells and then lock only specific cells and ranges before you protect the worksheet.
Once you encrypt an Excel file, no one else will be able to open it. This is the most common and recommended technique to lock an Excel file.