Every Excel file has metadata. According to Wikipedia, “Metadata is data [information] that provides information about other data”. That means, metadata is some data which is not your content of your file but rather information like the author name, data saved or even the file name. Or in other words: If your Excel file is a letter or parcel, the address written on it is the metadata.
In many cases, the metadata is very useful: You can easily see who edited the file the last time or when was it saved the last time. But sometimes, you want to remove this information. For example, when you send your file to a client and it still contains somehow data of your previous client.
This article introduces 5 methods to see, change and remove the metadata of your Excel file.
Method 1. View most important metadata (e.g. author name)
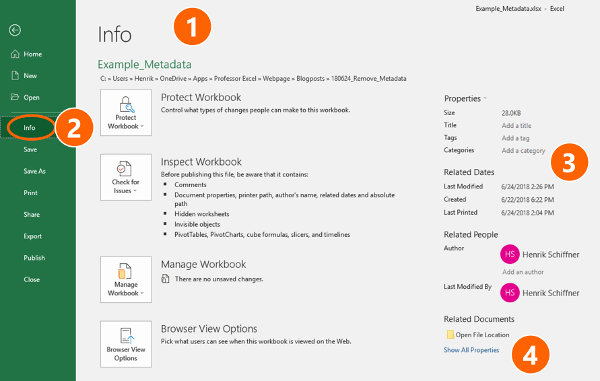
The first method is actually quite simple. Excel can show you the most relevant metadata – the “document properties”. Just follow these steps.
- Open your Excel file in Excel and click on “File” in the top-left corner of the window. Alternatively press Alt and then F on the keyboard.
- Click on “Info” on the left-hand side.
- Excel shows a good summary of the document properties saved to this file.
- If you want to see (a few) more details, click on “Show All Properties”.
Most properties you can change here right away. Just click into the field (for example “Add a title” or “Add an author”).
Method 2. See the metadata with the Windows Explorer
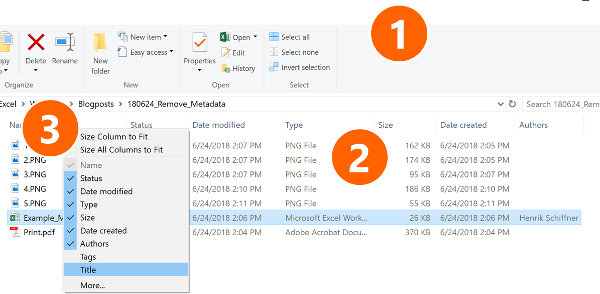
The Windows Explorer can also show the most important metadata. The advantage is that you don’t even have to open the file. Say you have a password protected Excel file and still want to know when it was saved or what day it was created. Please note: If the file is password protected, some information is not show, e.g. the author name.
Follow these steps.
- Navigate to the file in the Windows Explorer.
- Select the view “Details”. In order to achieve this, click go to the “View” ribbon and click on “Details” within the “Layout” group.
- You can further select what type of data you’d like to see. Just right-click on the header row and set the check-marks for the desired items.
Method 3. Use the Excel Document Inspector
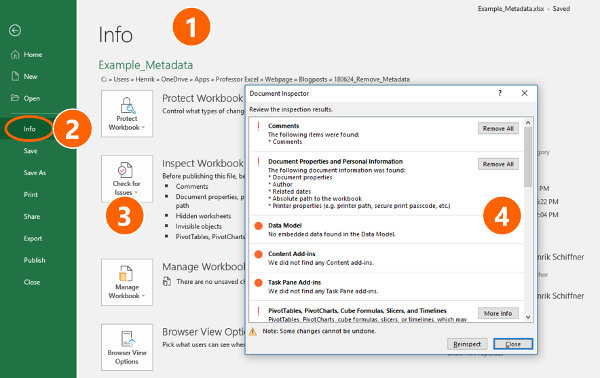
This method is especially useful if you want to remove all metadata before sharing your Excel file. Excel provides a function to check your file for you. Not only metadata, but anything possible confidential is found and can be removed with just a few clicks.
- Open your Excel file in Excel and click on “File” in the top-left corner of the window. Alternatively press Alt and then F on the keyboard.
- Click on “Info” on the left-hand side.
- Click on “Check for Issues” and then on “Inspect Document”.
- Click on “Inspect”. After the usually quick analysis, Excel shows you the results and offers to remove most of the issues.
Unfortunately, the Document Inspector for many cases doesn’t provide further information (like the actual author name) but just offers to remove them. The advantage of this function is that you gain a comprehensive impression of all the issues – not only the metadata itself – but also other possibly confidential content.
Method 4. Professor Excel Tools
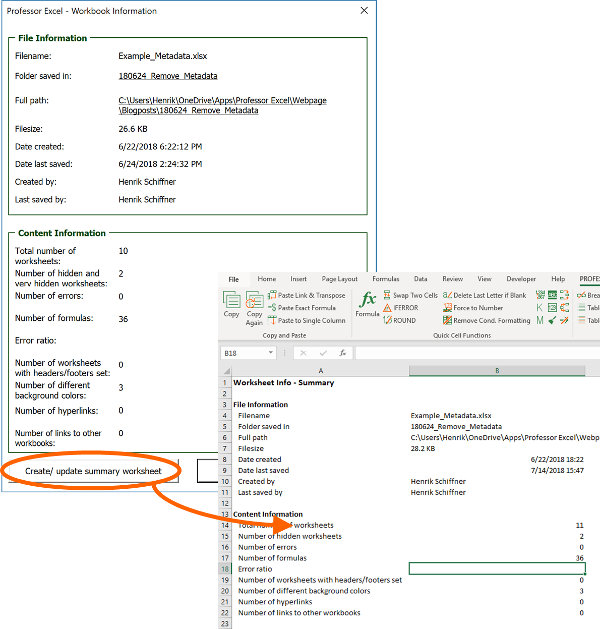
You want to gain a quick impression of the metadata? We’ve added such function to our Excel add-in “Professor Excel Tools”. Just click on “Info” on the right-hand side of the “Professor Excel” ribbon.
It summarizes the following data.
- Filename.
- Folder saved in (if you click on the link the folder opens).
- Full path.
- Filesize.
- Date created.
- Date last saved.
- Created by.
- Last saved by.
Furthermore, you can see a summary of your content, e.g. the number of worksheets, hidden worksheets, headers and footers, hyperlinks, links to other workbooks and so on.
The best: With one click you can insert a summary worksheet so that you can comfortably copy and paste the information.

This function is included in our Excel Add-In ‘Professor Excel Tools’
(No sign-up, download starts directly)
More than 35,000 users can’t be wrong.
Method 5. Other hidden data
Besides other document inspector, you can also manually check for other hidden data in your Excel file. The advantage of doing it manually: You can decide for each single item what to do with it. Remove, keep or change.
You could start with the following items.
- Named ranges. Named ranges can contain folder path or other important information. Go to this page for more information.
- Links to other workbooks. Links again can show long folder path, for example to another clients file. Check this article for more information.
- Hidden and very hidden sheets. Make sure that your Excel file doesn’t have any (unwanted) hidden or very hidden worksheets. This article has more information.
- Hidden rows and columns. Did you hide rows or columns in your workbook? Here is how you can open them all at once.
- Print titles. Does your workbook have (old) print headers and footers? This article has more information of how to edit them on all sheets at the same time.
Do you want to boost your productivity in Excel?
Get the Professor Excel ribbon!

Add more than 120 great features to Excel!
Method 6. See the raw contents of your file
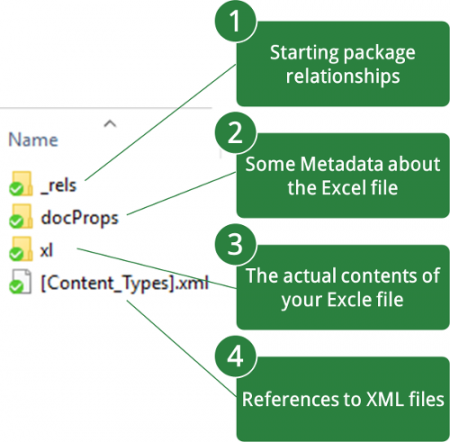
Our 6th and last method is probably more relevant to advanced users. You can check all the raw contents of your file. It’s recommended to save your file, close it and create a copy. Rename the copy and replace the .xlsx in the by .zip. Now you can open the .zip file, click on “docProps” and open “core.xml”. Now you can see some main metadata and change it. But please be careful: some changes might damage your Excel file.
This article has more information concerning this method and provides more detailed instructions.

