You have just finished your work and want to send your file to your boss. He is waiting for it. But instead of sending the email, you just receive and error: The file size is too large. This is the moment you tell yourself not to panic. And actually there is no reason to panic. There are many ways to reduce the file size of your Excel workbook.
There is a lot of advice on the internet of how to reduce the file size of an Excel workbook. We’ve also published an article about that. But which of these methods really help? We can’t say for sure. That’s why we’ve conducted a study, applying the most popular (and some more) methods for reducing the file size. Here are the results.
Method
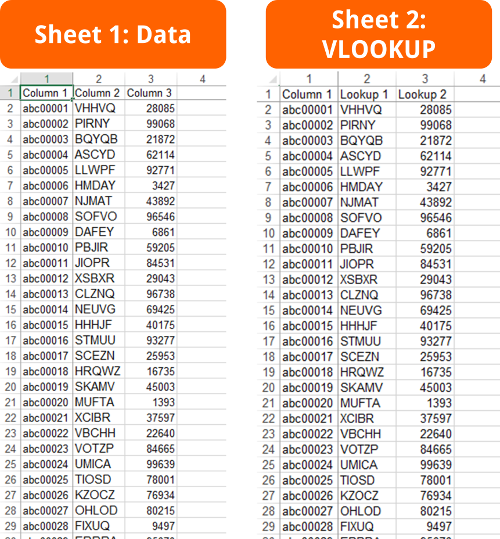
Before we start, some words about the method (let’s keep it short here, though). We used an Excel file with two worksheets, each sheet has got 3 columns and 10,000 data sets (+ 1 heading row). Sheet1 has pure data as hard values, Sheet2 has data in column A and VLOOKUPs in columns B and C.
We always change one aspect and see the effect on the file size.
Please note: The values of the possible reduction are only valid for this specific test file. With this study we want to examine the general impact of each advice. For your file, the actual result might differ.
Results of reducing the file size
Advice 1: Save as XLSB file instead of XLSX
The default file format in Excel is XLSX. But there are also alternatives: The old format XLS or the less known format XLSB. The “B” in XLSB stands for binary. The XLSX format is basically a XML format. Worksheets are saved in the XML file type.
But back to our question: Which file type is the smallest?
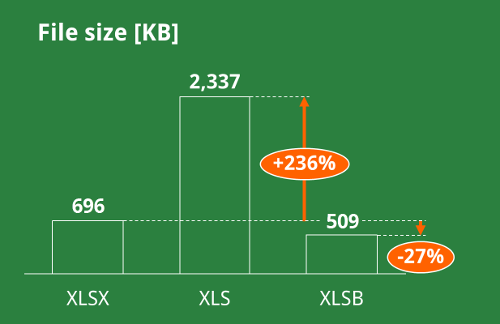
For our test file, the XLSX file is 696 KB large. We didn’t add any formatting, just data and VLOOKUP formulas.
Saving the workbook as a XLS file will use 2,337 KB. That’s +236%. But there is also a smaller file type: XLSB. It just takes 509 KB. That’s almost 27% smaller than XLSX.
Excursus: Advantages and disadvantages of the XLSB file type
So why not always use the XLSB format? There are some advantages and disadvantages. Let’s take a quick look:
| Advantages | Disadvantages |
|---|---|
|
|
Advice 2: Don’t format the whole column
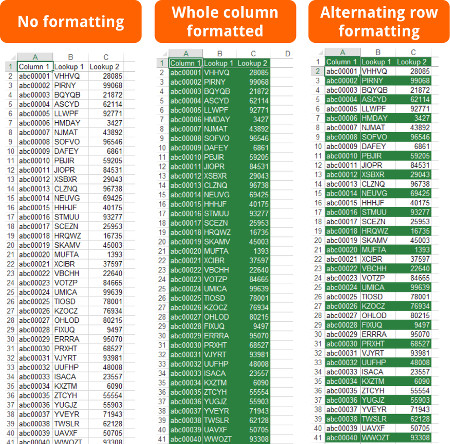
Another very popular advice: Don’t apply formatting to the whole column. Instead, just format the cell range you use as shown in the picture on the right side. Is it true?
We tested three options:
- The file size with no formatting added to any cell.
- The complete column with a green background and white font color.
- Each row with alternating formatting (green background with white font color and clear background with black font (=default formatting).
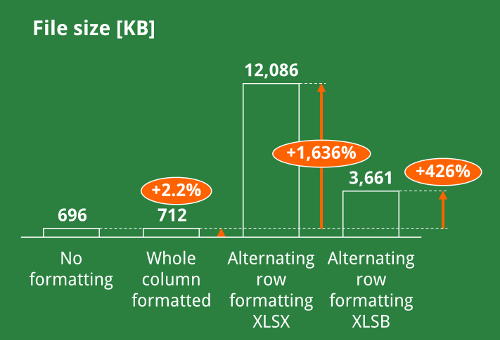
The result: The advice not to use formatting for other cells than the used cell range is partly true. Formatting 6 whole columns enlarged the size by 6 KB. But using alternating formatting on the complete column increased the file size by 11.4 MB (or 1,636%).
But why does the alternating row formatting take so much space?
Simplified speaking: If you use formating on the whole column, Excel only saves something like “Use style 1 in columns A, B, C”. But if your formatting changes in each row, Excel saves for every row
- “Use style 1 in columns A, B, C and row 1”
- “Use style 2 in columns A, B, C and row 2”
- “Use style 1 in columns A, B, C and row 3”
- and so on.
Advice 3: Replace formulas by values
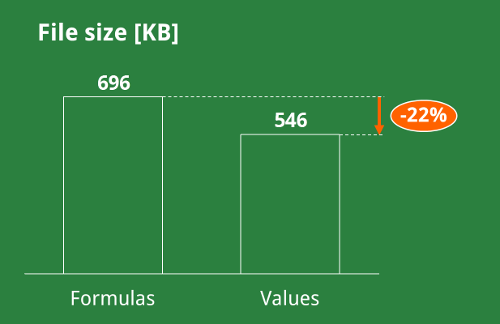
Does it help to replace formulas by values? In our test file we got 40,006 cells filled with hard values. Furthermore, we got 20,000 cells containing formulas (all VLOOKUP formulas). What effect does it have on the file size if we replace the 20,000 formula cells with their calculated values?
The effect seems clear: The file size reduces by almost 22%. Our explanation: For formulas, Excel saves the formulas as well as the results. That way, you can immediately see the results of formulas – also when you open large files or your Excel is set to manual calculation.
Another positive implication: The calculation is much faster. But – of course – hard values won’t be recalculated.
Please note: This effect (as most of the others) highly depends on the number and length of the formulas in your workbook.
Advice 4: Use a shared cache for several PivotTables
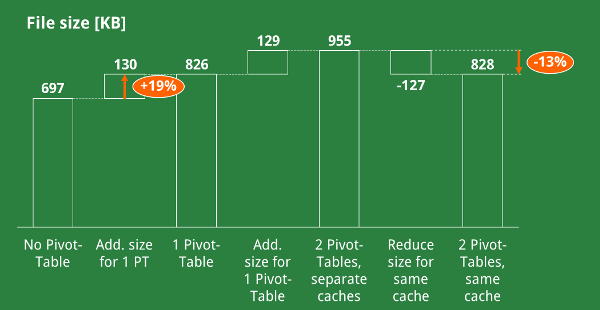
PivotTables have a large impact on your workbooks file size. We got a base file which has no PivotTable. After adding a PivotTable for 10,000 rows and 3 columns, the file size gains(?) 130 KB or 19%.
By adding another PivotTable of the same source data – without using the same cache – the file size gets 129 KB bigger. But if we choose to use the same cache for both PivotTables, the file size just gains 2 KB when adding the second PivotTable. Or in other words: We reduce the file size by 13%.
Do you want to boost your productivity in Excel?
Get the Professor Excel ribbon!

Add more than 120 great features to Excel!
Advice 5: Avoid region specific characters
In our study about how to reduce the calculation time we found out that changing the computers region has an extremely big impact. So is there a similar effect on the file size if we use special characters?
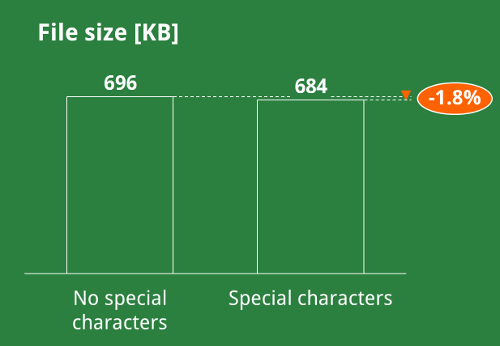
In order to determine the impact on the file size we replaced all standard English letters by random German special characters. So we only use Ä, Ö, Ü, ä, ö, ü and ß. In total, we replaced 10,000 of 60,006 cells that way.
Surprisingly, the file size even reduces slightly, in this case by 1.8%.
Advice 6: Use VLOOKUP instead of SUMIFS or INDEX-MATCH
This is our old battle: VLOOKUP vs. INDEX-MATCH vs. SUMIFS. While the SUMIFS formula has many advantages towards VLOOKUP and INDEX-MATCH, it comes with two major disadvantages: It can only return numeric values or dates and it slows down the calculation speed significantly.
But what about the file size?
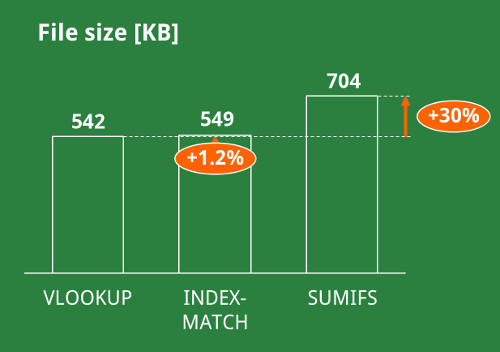
The effect is clear: SUMIFS enlarges the file size. In our test file we replaced 10,000 VLOOKUP formulas with SUMIFS. This leads to a 30% bigger file.
INDEX-MATCH on the other hand just enlarge the file size by 1.2%.
Advice 7: Remove unnecessary named ranges
Sometimes Excel files collect several thousands of named ranges. Especially software for exporting data to Excel often creates lot’s of them. The problem: Most of them are not visible to the user (e.g. not shown in the name manager) and they usually just keep getting more.
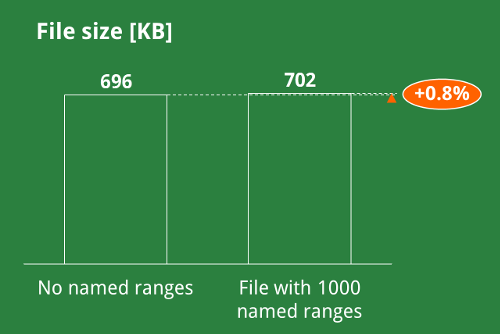
In order to see the effect on the file size, we created 1,000 named ranges with a VBA macro. So what is the impact on the file size?
Our test shows that the effect is just minor. 1,000 named ranges increase the file size approximately 6 KB – that’s 0.8% of our test file.
Advice 8: Use the “Table format”
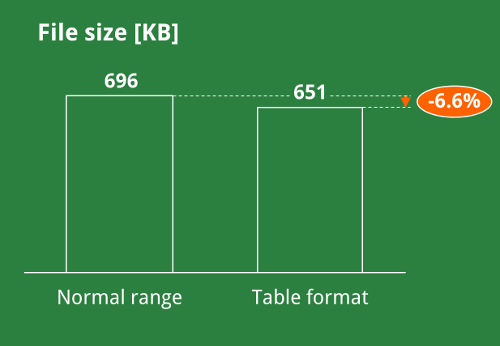
Excel offers a so-called “Table format”. It’s basically type of table, organized in a structured way. If you convert your table to the table format, do you save space on the disk?
The answer is: yes. Our test file is app. 6.6% smaller compared to using normal ranges.
Advice 9: ZIP your Excel file

Excel files are actually ZIP files. If you are interested in seeing all the contents of your workbook you can just change the file type ending of the file name: Write “.ZIP” instead of “.XLSX”. Don’t ZIP your file, really just rename it.
Now you can unzip it. You will be able to see all the enclosed files.
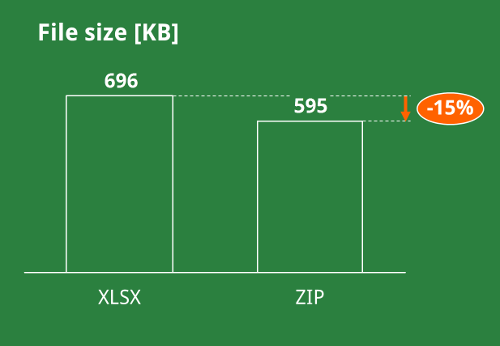
Our question: As Excel files are already zipped files, does it make sense to ZIP them one more time?
Surprisingly, we reduced the file size by 15% after zipping our Excel file.
Advice 10: Don’t use pictures in your workbook
Pictures by nature take a lot of disk space. So what happens if you add pictures to your Excel workbook?
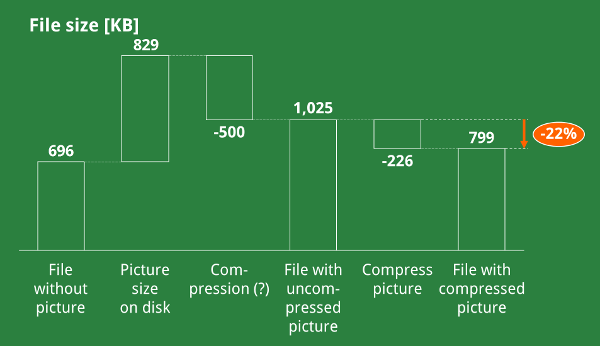
We’ve conducted several steps: First we noted the file size of an Excel workbook without any images. Then we added a 829 KB picture.
Surprisingly, the file size of our test workbook only increased by 329 KB. So we assumed that Excel already applies some kind of compression. It might also be related to the fact, that Excel files are ZIP files as described in our advice 9.
Now we used the compression feature, provided by Excel. We chose the option “E-Mail 96 PPI” in order to minimize the document size. The result: Our originally 829 KB picture was already reduced to 329 KB by just inserting it. The compression further reduced the size to 103 KB.
Our workbook size was reduced by 22% through the action of compression the picture. Of course, this highly depends on your Excel file and your picture.
Summary
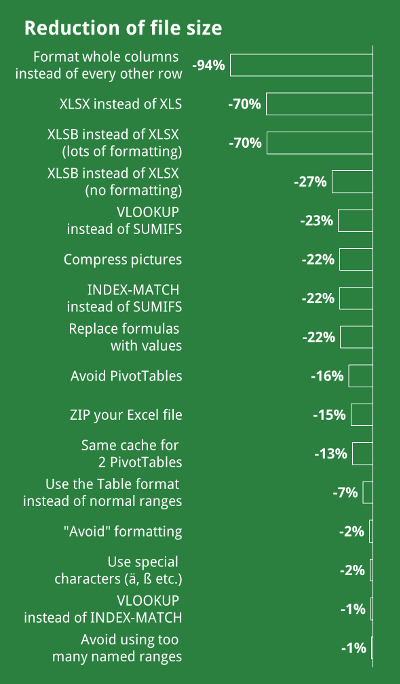
There are many ways to reduce the file size of your Excel file. In our test we found out that some of the work quite well and others just have a very small effect.
- The most important advice: Don’t use alternating formatting on the whole column. If you want to use formatting on a column make sure, that you apply it to the complete column.
- Are you still using the old XLS format? Maybe now it’s time to change to the “new” XLSX file type and save up to 70%
- Furthermore, you can save between 27% and 70% by not using XLSX file type but rather XLSB.
- You are a fan of the SUMIFS formula for lookups? If you use VLOOKUP or INDEX-MATCH, you could save app. 22% to 23% of file size.
- If your Excel file contains images, you might want to consider using the compression feature in Excel. Our test file was reduced by 22%.
- Another option for reducing the file size of your Excel workbook is to replace formulas by values.
- PivotTables use a cache for the data. If you could avoid PivotTables, you could reduce the file size. If you got several PivotTables using the same data source, make sure that they share the same cache.
- Zipping your Excel file could further reduce the file size.
- All the other advice seem to have only a minor impact on the file size.
Expert tip: Check the size of each worksheet
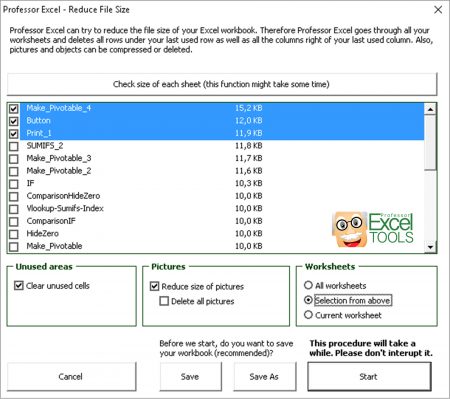
The Excel add-in “Professor Excel Tools” has a very handy function: It tells you the size of each worksheet! That way you don’t need to waste time trying to reduce unnecessary parts of your workbook. Start with the largest worksheets and reduce them first.
You can try “Professor Excel Tools” for 7 days for free. Try it now!

This function is included in our Excel Add-In ‘Professor Excel Tools’
(No sign-up, download starts directly)
More than 35,000 users can’t be wrong.

